Introduction
With the network infrastructure already defined in OPNsense with the article above, the next step consists of preparing the virtual machines that will form part of the CTF lab. From this point on, each VM must be correctly integrated into the DMZ and internal networks, respecting the previously established segmentation.
Installation of the virtual machines
We will perform the installation in VirtualBox of two Debian Linux virtual machines with the smallest number of tools installed since the necessary ones will be installed later. To speed up the installation time, the network version of Debian can be used. The requirements for the machines will be 2 CPU cores, 2 GB of RAM, and 8 GB of storage.
During the installation process, only the SSH server will be selected. As the least privileged user in the system, we will use server, with a simple password but different in the two machines. Around the password for the user root, we will use a complex one resistant to brute force attacks.
Network interface configuration
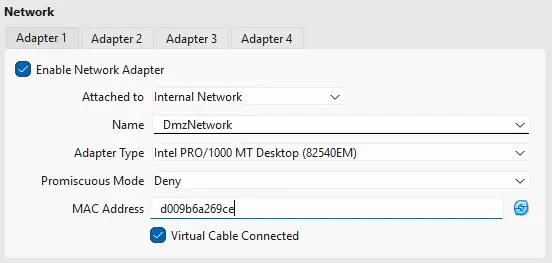
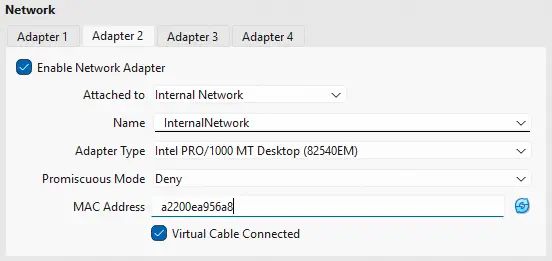
It is necessary to remember that in the network configuration it is necessary to specify the internal networks to which the virtual machine will belong and the MAC address configured in OPNsense so that the DHCP server knows which IP address to assign to the machines. Thus we configure the network interfaces of the virtual machine VM1.
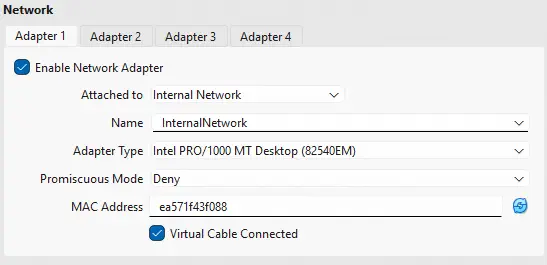
 Thus we configure the network interface of the virtual machine VM2.
 But to perform the installation, we need access to the Internet, so at the beginning we will use NAT interfaces to eventually configure the previous interfaces. We can also give the interfaces access to the Internet by modifying the firewall rules of OPNsense.
Configuration of the virtual machine VM1
We will start the configuration of the virtual machine through a connection using the SSH protocol and escalating to the root user in order to first activate the second network interface of the machine since it is not activated by default. This will be the one that provides access to the user to the internal network.
$ ssh server@192.168.0.2
server@vm1:~$ su root
root@vm1:/home/server# ip a
...
2: enp0s3: <BROADCAST,MULTICAST,UP,LOWER_UP> mtu 1500 qdisc fq_codel state UP group default qlen 1000
    link/ether d0:09:b6:a2:69:ce brd ff:ff:ff:ff:ff:ff
    altname enxd009b6a269ce
    inet 192.168.0.2/24 brd 192.168.0.255 scope global dynamic noprefixroute enp0s3
       valid_lft 85853sec preferred_lft 75053sec
    inet6 fe80::68d6:ff71:af93:ec17/64 scope link
       valid_lft forever preferred_lft forever
3: enp0s8: <BROADCAST,MULTICAST> mtu 1500 qdisc noop state DOWN group default qlen 1000
    link/ether a2:20:0e:a9:56:a8 brd ff:ff:ff:ff:ff:ff
    altname enxa2200ea956a8

root@vm1:/home/server# echo -e "\nallow-hotplug enp0s8\niface enp0s8 inet dhcp" >> /etc/network/interfaces
root@vm1:/home/server# systemctl restart networking
Now we install the tools we need in the system: SUDO, Docker, nftables.
root@vm1:/home/server# apt install sudo docker.io docker-compose nftables
Then we will configure the vulnerability in which the user server will be able to execute a command as the administrator user, less, to read the system logs, providing a functionality to deploy an interactive console.
root@vm1:/home/server# echo -e "\nserver ALL=(root) NOPASSWD: /usr/bin/less /var/log/installer/syslog" >> /etc/sudoers
Now we will use Docker to configure a vulnerable WordPress instance by copying an old configuration file to access the admin panel and uploading a malicious plugin to gain remote command execution. We will use Docker Compose to deploy the environment with the following configuration docker-compose.yaml. We will configure the password for the user to access the machine via SSH using the environment variable AUTOMATION_TOKEN.
services:
    db:
        image: mariadb:10
        restart: unless-stopped
        environment:
            - MYSQL_ROOT_PASSWORD=1Hpk7A52uDeEwFSOrTKr
            - MYSQL_DATABASE=wordpress
            - MYSQL_USER=server
            - MYSQL_PASSWORD=iEX8VxWG5J0zdYfhXikT
    web:
        image: wordpress:6
        restart: unless-stopped
        depends_on:
            - db
        environment:
            - WORDPRESS_DB_USER=server
            - WORDPRESS_DB_PASSWORD=iEX8VxWG5J0zdYfhXikT
            - WORDPRESS_DB_HOST=db
            - WORDPRESS_DB_NAME=wordpress
            - AUTOMATION_TOKEN=yingyang
        ports:
            - 80:80
We start the environment by deploying the container that will contain the MariaDB database and the container that will contain the web server hosting WordPress.
root@vm1:~# cd /root
root@vm1:~# vi docker-compose.yaml
root@vm1:~# docker compose up -d
[+] Running 3/3
 ✔ Network tmp_default  Created
 ✔ Container tmp-db-1   Started
 ✔ Container tmp-web-1  Started
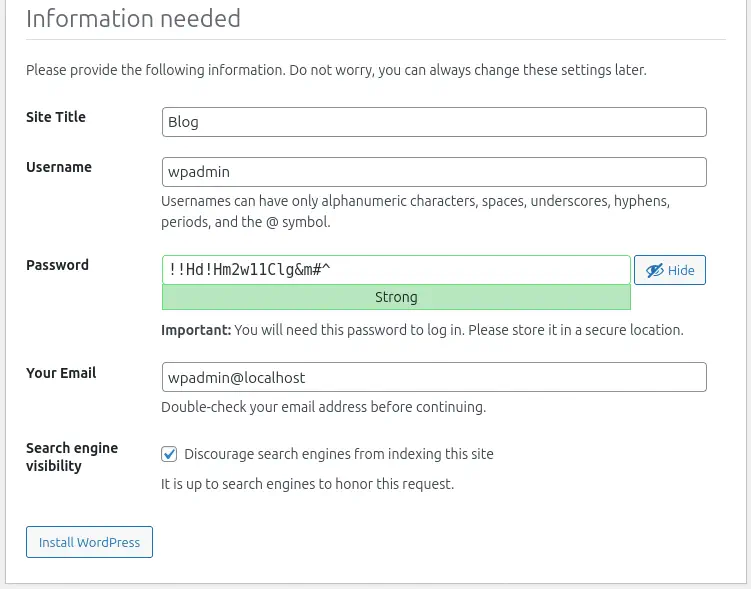
Now we will configure the WordPress instance through its web assistant. We will have a randomly generated password for which we will take note in order to log in later.
 After configuring the web application and gaining access to the admin panel, we will return to the console and deploy an interactive console via Docker to the web container.
root@vm1:~# docker exec -it tmp-web-1 bash
We create a copy of the file wp-config.php into the file wp-config.php.bak and edit it adding the previously generated credentials. We will modify any of the parameters found in the file, in this case define( 'DB_USER', getenv_docker('WORDPRESS_DB_USER', 'example username') ); and define( 'DB_PASSWORD', getenv_docker('WORDPRESS_DB_PASSWORD', 'example password') );
root@e310ba85af9b:/var/www/html# cp wp-config.php wp-config.php.bak
root@e310ba85af9b:/var/www/html# nano wp-config.php.bak
After obtaining user access to the admin panel, they will be able to gain remote command execution by uploading a malicious plugin that deploys a reverse shell. They will obtain the password of the user server by enumerating the environment variables and will be able to log in via SSH to then escalate privileges to root using the previously configured vulnerability.
Finally we create persistent firewall rules to allow access to the machine only from the LAN network, from the VPN clients and from the VM2 machine. We assume that the IP address of the VM2 machine has an octet more than the VM1 (.2 to .3).
root@vm1:~# nft add table inet lab
root@vm1:~# nft add chain inet lab input '{ type filter hook input priority 0 ; }'
root@vm1:~# nft add rule inet lab input ip saddr 10.0.10.0/24 accept
root@vm1:~# nft add rule inet lab input iif "enp0s3" ip saddr 100.100.100.0/24 accept
root@vm1:~# nft add rule inet lab input iif "enp0s8" ip saddr 172.16.0.3 accept
root@vm1:~# nft add rule inet lab input iif "enp0s3" reject
root@vm1:~# nft add rule inet lab input iif "enp0s8" reject
root@vm1:~# mkdir -p /etc/nftables
root@vm1:~# nft list table inet lab > /etc/nftables/lab.rules
root@vm1:~# echo -e '\ninclude "/etc/nftables/lab.rules"' >> /etc/nftables.conf
root@vm1:~# systemctl enable nftables
root@vm1:~# systemctl start nftables
Configuration of the virtual machine VM2
We will start the configuration of the virtual machine through a connection using the SSH protocol and escalating to the root user in order to first install the tools we need in the system: SUDO, Docker, nftables, KeePassXC.
root@vm1:/home/server# apt install sudo docker.io docker-compose nftables keepassxc
root@vm2:/home/server# cd
We deploy the FTP server using Docker Compose with the following configuration file docker-compose.yaml.
services:
    ftp-server:
        container_name: my-ftp-server
        restart: unless-stopped
        environment:
            - FTP_PASS=anonymous
            - FTP_USER=anonymous
        image: garethflowers/ftp-server
        ports:
            - "20-21:20-21/tcp"
            - "40000-40009:40000-40009/tcp"
        volumes:
            - "/root/ftp_root:/home/anonymous"
We create the directory /root/ftp_root, which will be the root directory of the FTP server where the files will be stored and we initialize the container.
root@vm2:~# docker compose up -d
[+] Running 5/5
 ✔ ftp-server Pulled
 ✔ 1f3e46996e29 Pull complete
 ✔ 2d99d708cc3e Pull complete
 ✔ cd0faf35dc26 Pull complete
 ✔ 1288b7737817 Pull complete
[+] Running 2/2
 ✔ Network root_default Created
 ✔ Container my-ftp-server Started
Now we create the file containing the KeePass passwords by creating a new KeePass database and a new entry, in this case RootCreds.
root@vm2:~# keepassxc-cli db-create ftp_root/passwords.kdbx -p
root@vm2:~# keepassxc-cli add ftp_root/passwords.kdbx RootCreds -u root -p
Finally we create persistent firewall rules to allow access to the machine only from the LAN network, and from the VM1 machine. We assume that the IP address of the VM1 machine has an octet less than the VM1 (.3 to .2).
root@vm2:~# nft add table inet lab
root@vm2:~# nft add chain inet lab input '{ type filter hook input priority 0 ; }'
root@vm2:~# nft add rule inet lab input ip saddr 10.0.10.0/24 accept
root@vm2:~# nft add rule inet lab input iif "enp0s3" ip saddr 172.16.0.2 accept
root@vm2:~# nft add rule inet lab input iif "enp0s3" reject
root@vm2:~# mkdir -p /etc/nftables
root@vm2:~# nft list table inet lab > /etc/nftables/lab.rules
root@vm2:~# echo -e '\ninclude "/etc/nftables/lab.rules"' >> /etc/nftables.conf
root@vm2:~# systemctl enable nftables
root@vm2:~# systemctl start nftables
Conclusion
After completing the configuration of the lab machines in VirtualBox, the environment is fully configured and ready to be solved by the users. As next steps, the step-by-step resolution of the environment would be found.