Introduction
The Capture The Flag (CTF) have become one of the most effective methods to learn cybersecurity in a practical way. The possibility of facing real challenges in a controlled environment allows students and professionals to experiment with pentesting techniques without risks. In this article, the design of a multi-user CTF-oriented lab is described, built on Oracle VirtualBox and OPNsense, where each participant has a completely isolated environment from the rest.
The architecture of each lab includes an OPNsense firewall and two virtual machines that simulate a small corporate environment. OPNsense acts as the core of the infrastructure, managing internal networks and user connections via OpenVPN. The first of the virtual machines is connected to both the DMZ and the internal network, becoming the initial point of exposure and attack. The second machine, on the other hand, is only accessible from the internal network, which forces the participant to use pivoting techniques to reach it.
The networks of the lab are carefully segmented. Each environment has its own DMZ network, intended to expose only the first machine, and an internal network where the second machine resides. Through OPNsense, rules are defined that strictly limit communications, both between networks and between labs, ensuring that each user works only within their own space. This separation allows for multiple environments to run simultaneously without the risk of interference.
Access for participants is done through an OpenVPN tunnel managed by OPNsense. Upon connecting, each user gains exclusive access to their virtual environment, starting with the first machine. This VM hosts a vulnerable WordPress installation that requires prior authentication, designed to serve as the starting point for the CTF. Thanks to known vulnerabilities, it is possible to obtain limited remote execution. From there, the user can perform privilege escalation based on documented techniques, reinforcing knowledge of post-exploitation in Linux systems.
Once the first machine is compromised, the next step is to access the second, located in the internal network and without direct exposure to the outside. To do this, the participant must apply pivoting and traffic redirection techniques, using tools. This phase introduces a more realistic scenario of lateral movement, in which the user must understand how tunnels, proxies, and jumps between isolated networks function.
The second machine offers an environment designed to encourage enumeration and analysis of internal services. It contains an FTP server accessible via anonymous credentials, where a file kdbx is stored. This file, when processed appropriately, allows the retrieval of critical information that provides privileged access to the machine through SSH. With this, the participant completes a full cycle of intrusion: initial entry, consolidation, pivoting, and final compromise of an internal system.
The key to this entire design is the strict isolation between different user labs. OPNsense allows defining firewall rules that completely segment each environment, preventing any communication between labs even in advanced stages of exploitation. Combined with the specific configuration of the virtual machines, this approach ensures that each participant has an independent, secure, and fully replicable environment.
In summary, this lab offers a realistic and complete environment to practice cybersecurity skills, from web exploitation to advanced post-exploitation techniques in segmented networks. Its modular design facilitates scaling the number of users, reusing scenarios, and adapting them to different courses, workshops, or competitions.
Installation of OPNsense
First, the OPNsense virtual machine will be installed, which will have the requirements of 2 CPU cores, 4 GB of RAM, and 8 GB of storage. Four interfaces will be configured:
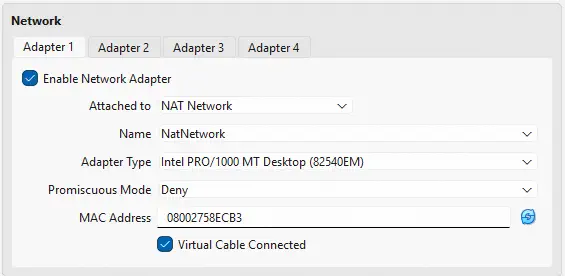
- The first of the interfaces will be the WAN network, that is, the network from which Internet access will be available and from which the CTF users will be connected. In this case, it will be a NAT network, for this purpose we will create a NAT network from VirtualBox in the subnet
10.0.0.0/24.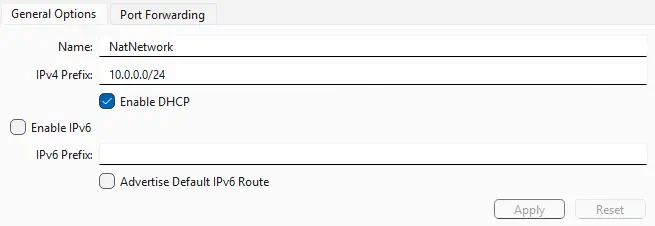
- The second of the interfaces will be the LAN network of OPNsense, which will be mainly used for accessing the administration of OPNsense via web, so no other devices will be connected to it. It will have the subnet
10.0.10.0/24, and will be an internal network namedLanNetwork, in which OPNsense will act as a DHCP server.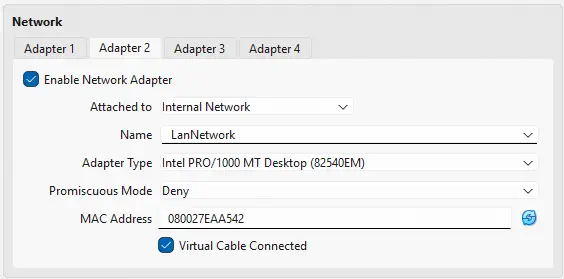
- The third of the interfaces will be the DMZ network to which the CTF users will have access after connecting to the VPN. It will have the subnet
192.168.0.0/24, and will be an internal network namedDmzNetwork, in which OPNsense will act as a DHCP server.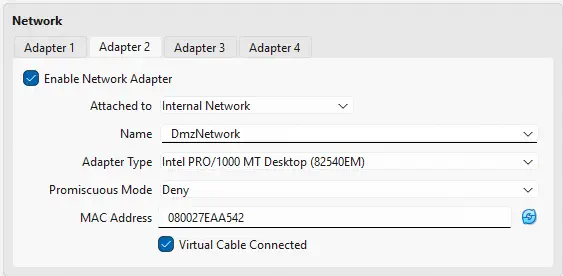
- The fourth of the interfaces will be the DMZ network to which the CTF users will have access after connecting to the VPN. It will have the subnet
172.16.0.0/24, and will be an internal network namedInternalNetwork, in which OPNsense will act as a DHCP server.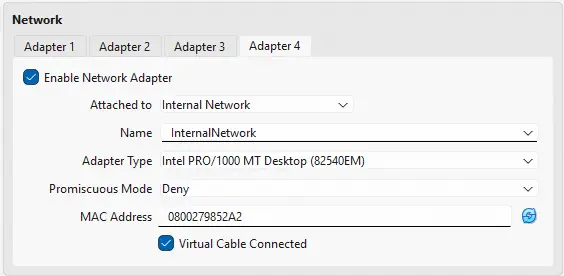 After the configuration of the network interfaces we will start the machine and install OPNsense following the assistant’s instructions with the credentials
 installer:opnsenseuntil the system restarts and we can access the initial options menu with the default credentialsroot:opnsense.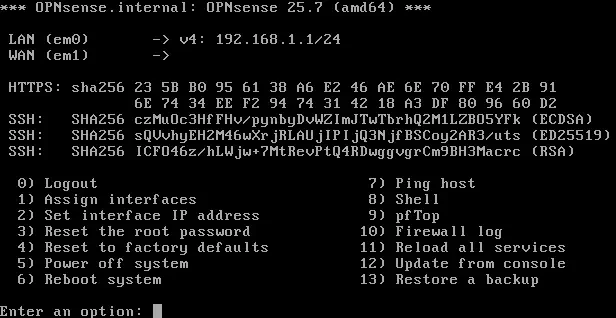
Configuration of OPNsense
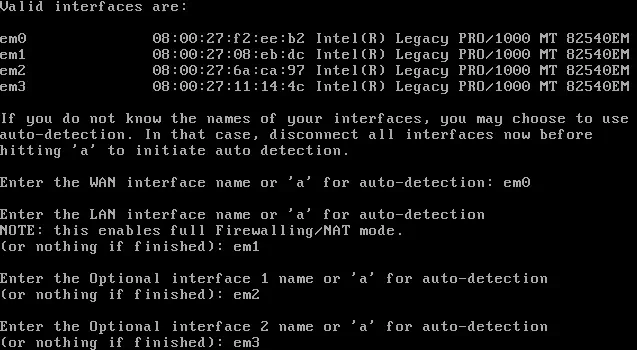
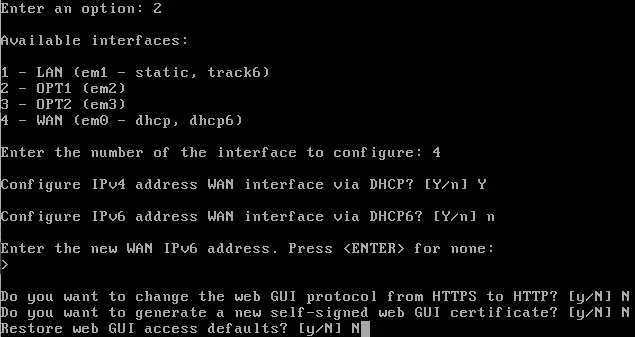
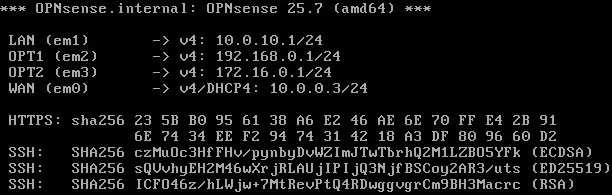
The initial interface assignment that is performed is incorrect, so they will be reconfigured through the option Assign interfaces and Set interface IP address. The configuration for the WAN interface and the LAN interface is shown. The configuration for the other two interfaces is similar to that of the LAN network.

 The configuration is already completed.
 Now we can configure another virtual machine with a network interface associated with the internal network
 LanNetwork to continue with the configuration of OPNsense using the web interface and its graphical assistant. We check that the IP address has been configured correctly.
$ ip a
2: enp0s3: <BROADCAST,MULTICAST,UP,LOWER_UP> mtu 1500 qdisc pfifo_fast state UP group default qlen 1000
    link/ether 08:00:27:a3:ac:c9 brd ff:ff:ff:ff:ff:ff
    inet 10.0.10.218/24 brd 10.0.10.255 scope global dynamic noprefixroute enp0s3
       valid_lft 85914sec preferred_lft 85914sec
    inet6 fe80::ef8e:54:5663:49c3/64 scope link noprefixroute
       valid_lft forever preferred_lft forever
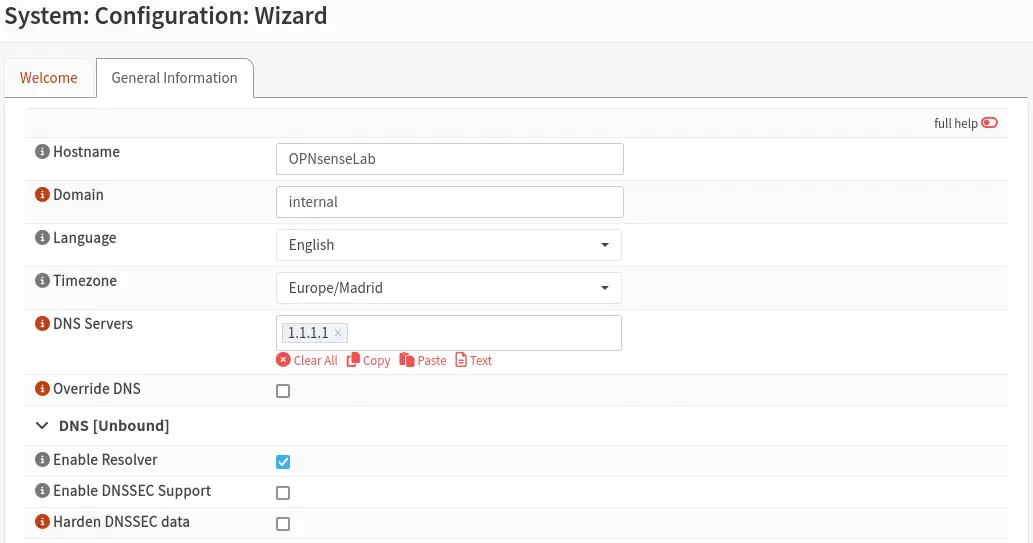
We access the web interface from the gateway and perform the initial configuration with settings such as the system name, time zone, or DNS.
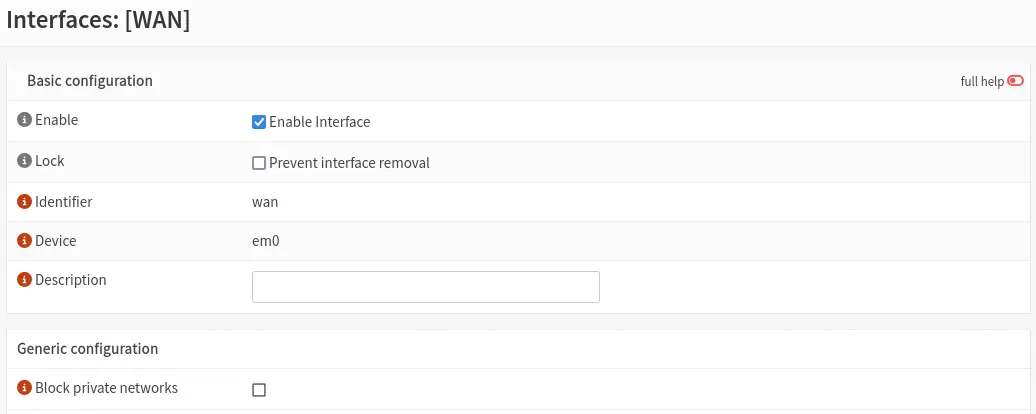
 When using in this case the WAN network private IP address ranges, it is necessary to disable from the menu
 Interfaces > [WAN] the option Block private networks so that the connectivity is correct.
Configuration of the OpenVPN server
Next we will configure the OpenVPN server by setting up a certificate authority first from the section System > Trust > Authorities. It is necessary to indicate a Common Name.
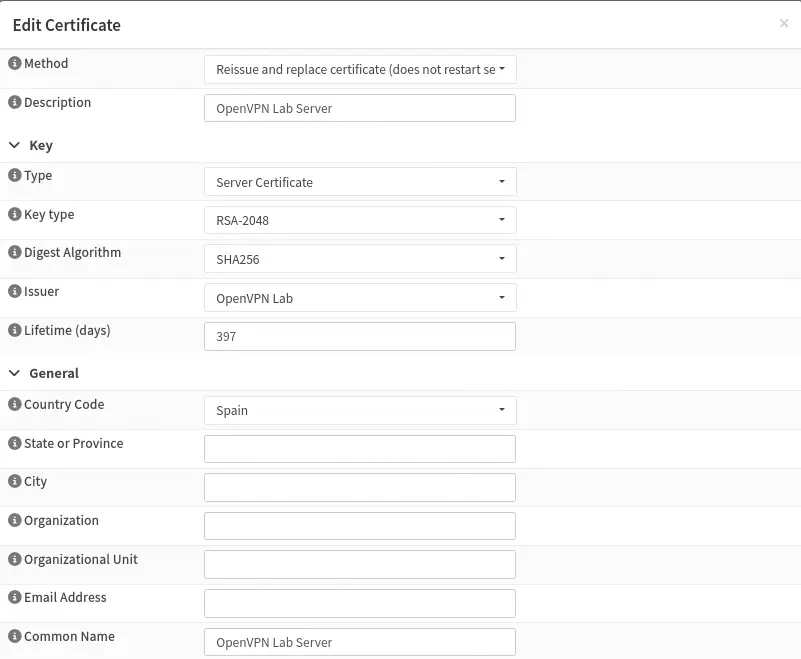
 We also need to generate the VPN server certificate from
 System > Trust > Certificates. It is necessary to indicate what is a server certificate, its common name, and that the certificate issuer is the certificate authority created earlier.
 After that we can configure the OpenVPN instance from
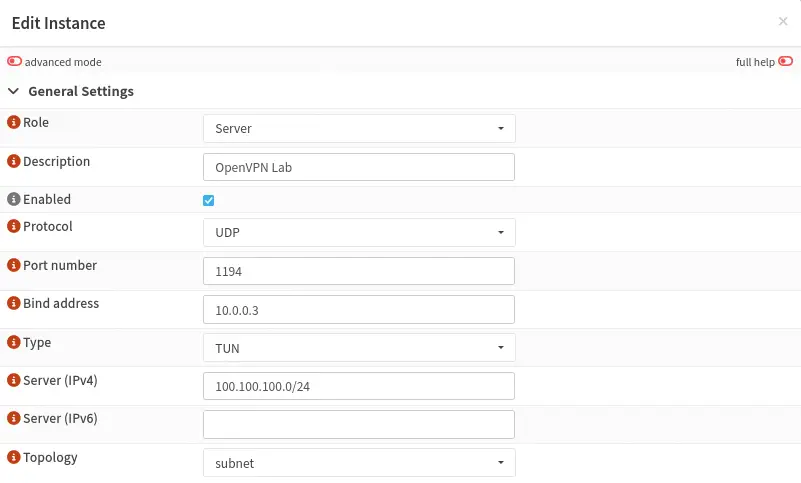
 VPN > OpenVPN > Instances. We configure the server mode, its description, its port, and the listen IP address, as well as the range of client IP addresses.
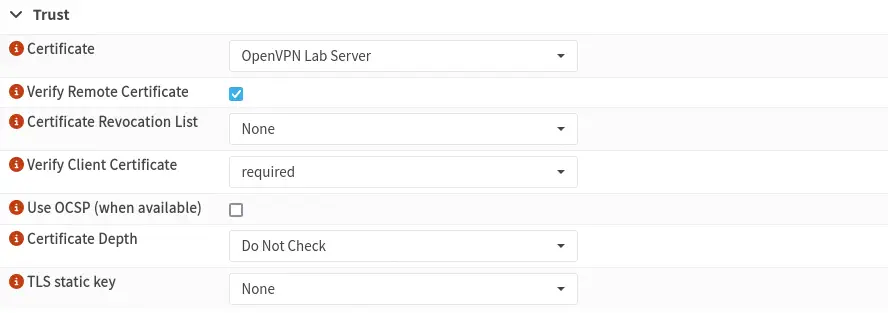
 Then we configure the VPN server certificate and the obligation to verify the server certificate.
 We configure the network that the VPN clients will have access to, in this case the DMZ network.
 We activate the advanced settings of the instance through the button
 advanced mode and configure the option Keep alive interval to 60 seconds and Keep alive timeout to 120 seconds to prevent SSH session disconnections via VPN.
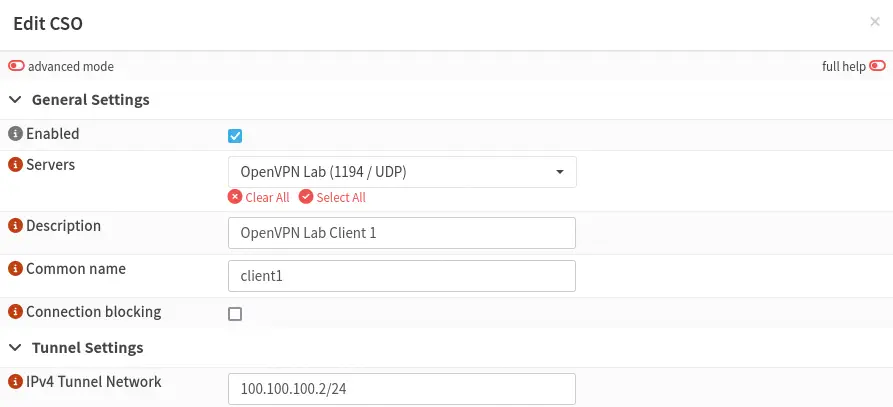
 We move to configure the specific client configuration of the first VPN client from the menu
 VPN > OpenVPN > Client Specific Overrides. We configure the VPN server, the description of the specific client configuration, the common name of the user, and the network address that the client will have in the VPN subnet.
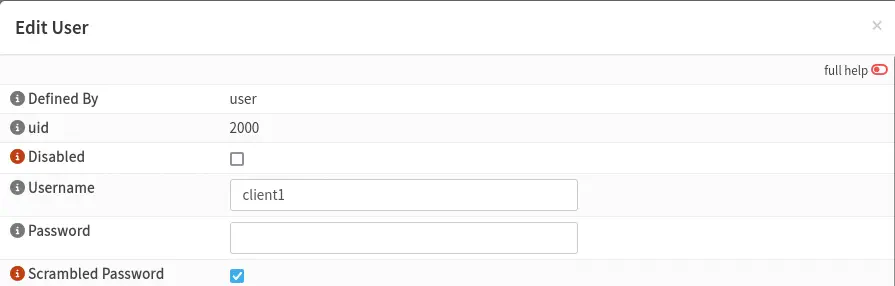
 Then we configure a new user in the system with the name that we generated earlier, from the menu
 System > Access > Users. We configure the username and the option Scrambled Password so that the user cannot be used for other purposes.
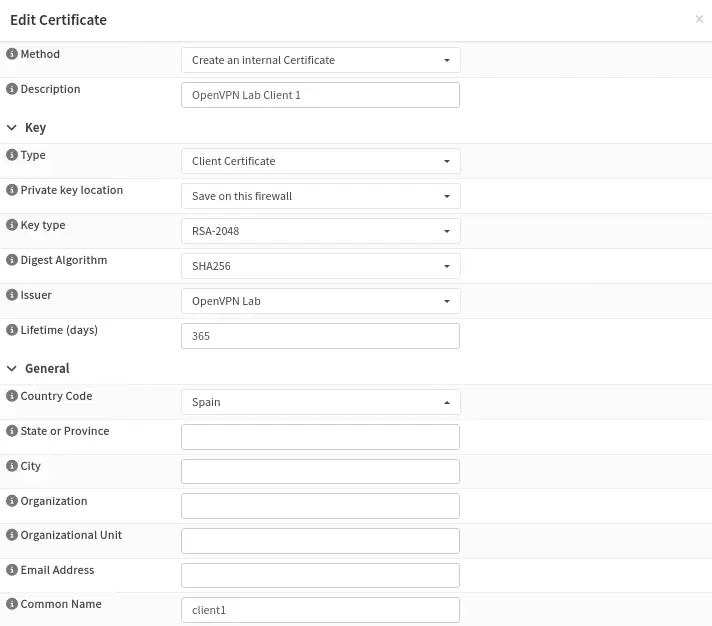
 After the user is created, we will create their certificate. First, we will click on the button next to the user’s row,
 Search certificates by username. Now we create an entry similar to the one of the previously created VPN server, highlighting the certificate issuer.
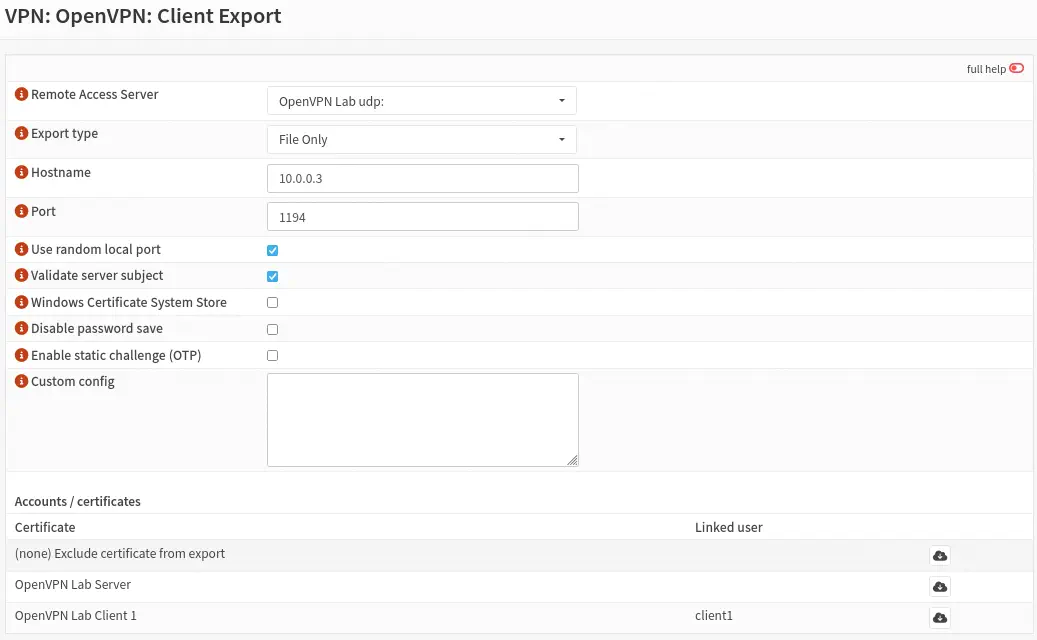
 Now we have the option to download the
 .ovpn file with which we will be able to connect to the OpenVPN server from the section VPN > OpenVPN > Client Export. It is necessary to configure the VPN server to use, the type of export to a single file, as host name we specify the IP address of the WAN interface, and the port. At the end of the page the downloads will appear.
 We will be able to download the file and check if the connection works correctly.
$ sudo openvpn OpenVPN_Lab_client1.ovpn
UDPv4 link remote: [AF_INET]10.0.0.3:1194
[OpenVPN Lab Server] Peer Connection Initiated with [AF_INET]10.0.0.3:1194
TUN/TAP device tun0 opened
net_iface_mtu_set: mtu 1500 for tun0
net_iface_up: set tun0 up
net_addr_v4_add: 100.100.100.2/24 dev tun0
Initialization Sequence Completed
With the message Initialization Sequence Completed we observe that the connection has been correct. We move to configure the parameters corresponding to the two virtual machines that we are going to create, first of all we are going to create static IP address assignments from the DHCP server.
Configuration of the DHCP server
For each group of replicated machines, it is necessary to set three static IP address assignments on the DHCP server, configuring the corresponding networks. Two of these assignments will be destined for the Linux VM1 machine (in the DMZ and internal networks), while the other two will be assigned to the Linux VM2 machine (in the internal network). This will be done from the section Services > Dnsmasq DNS & DHCP > Hosts. For each assignment we will indicate the MAC address and the IP address. Since the machines have not been configured yet, we will introduce random MAC addresses and the IP addresses.
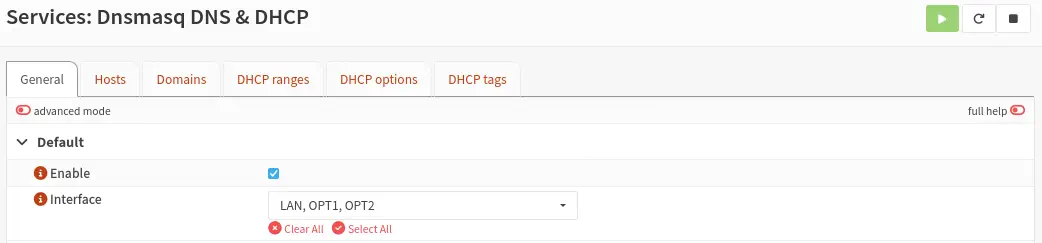
 Next we will enable the DHCP server on the DMZ (OPT1) and internal network (OPT2) interfaces in case it is not already activated in the
 General section.
 The VM1 machine will only be able to receive connections from the LAN network, from the VM1 machine, and from the VPN client. For this purpose, it will be necessary to configure some firewall rules from OPNsense and others from the machines themselves. We configure the rules from the menu
 Firewall > Rules.
Firewall Configuration
By default, and due to the firewall configuration, the user has no access to any network (although they have the preconfigured routes). It will be necessary to grant them access via a firewall rule to the Linux web machine. The Linux machine must also be able to access the VPN client.
From the rules of the OpenVPN interface, we grant access to the VPN user to the Linux machine in the DMZ network. We know the VPN user’s IP address as the source and the Linux machine’s IP address as the destination.
 From the rules of the DMZ interface, we grant access to the Linux web machine of the CTF network for the VPN user. We know the VPN user’s IP address as the destination and the IP address of the Linux machine VM1 as the source.
 We open the OpenVPN port so that it is accessible from the WAN network. We specify the VPN server as the destination, the VPN protocol, and the OpenVPN port as the destination port.
 In order to be able to access the open ports of the firewall, we have to activate the option
 Disable reply-to accessible from Firewall > Settings > Advanced.

Conclusion
After completing the network lab configuration in OPNsense, the environment is fully segmented and ready to support multiple users without interference between them. As next steps, the installation and configuration of the vulnerable virtual machines would be found.