Introduction️
To perform a security audit of an Android application, it is necessary to create a customized environment, which can be based on a physical device or an emulator. For most cases, an emulator will suffice. In this article we will create a virtual machine for Android in x86_64 architecture, and modify it by installing Magisk, to obtain superuser permissions and install modules, and install some applications.️
Installing the Android Emulator
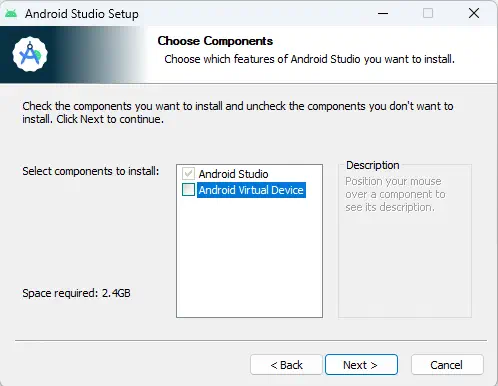
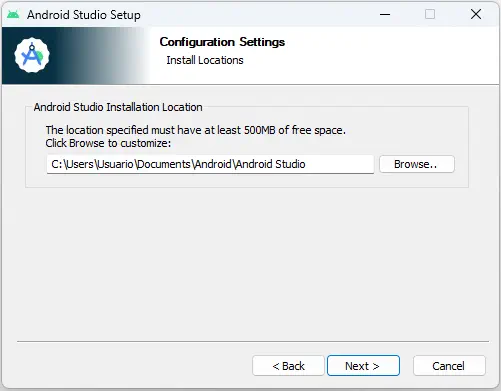
For the Android emulator, we have chosen the official Android IDE, Android Studio, which includes support for Android Virtual Devices (AVD). To install the IDE, simply go to its official website and download the installer by accepting the license terms. During the installation process, when selecting the components to install, we will deselect the option Android Virtual Device, as we will configure it later. In this case, we will install the IDE in our Documents directory.️
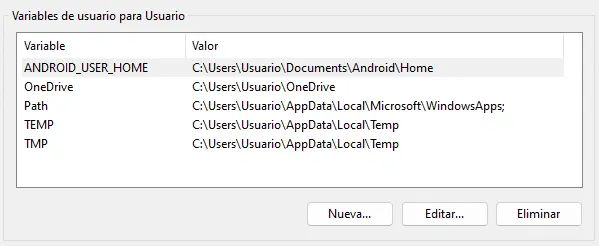
After the installation, we will not start the program, and optionally, set the user environment variable ANDROID_USER_HOME to the directory where we want to store configuration files and virtual machine data, which will be stored in a directory called .android.️
ANDROID_USER_HOME = C:\Users\Usuario\Documents\Android\Home
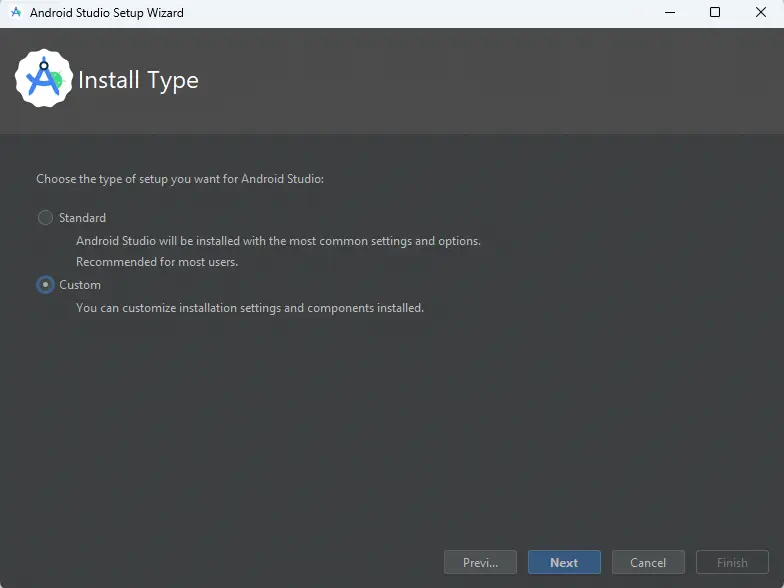
 From now on, we will start Android Studio by choosing not to import the configuration. We will see an assistant in which we will select a custom installation.️
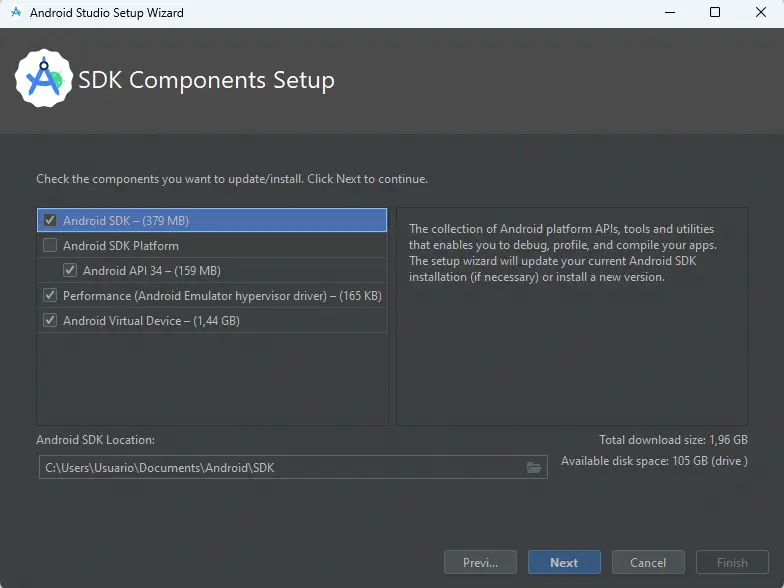
 When we select the elements to install, we will leave the default installation of installing everything and change the installation directory if necessary. We will accept the licenses and install the SDK.️
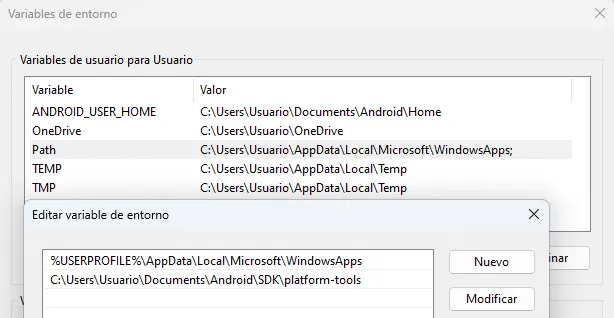
 After installation, the main window of Android Studio will open. We will add the platform-tools directory to the
 PATH in variables. It is located in the SDK installation directory, in the folder platform-tools.️
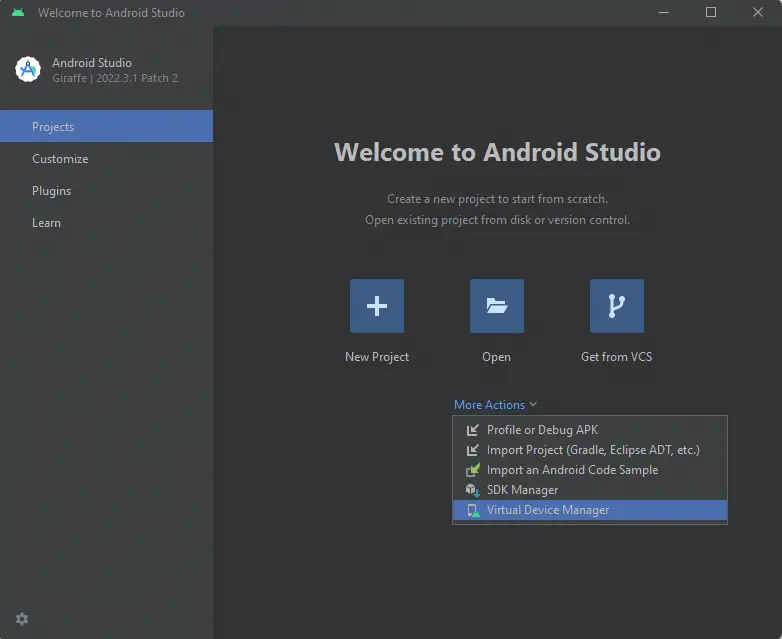
 After returning to Android Studio we will click the link
 More Actions and open the Virtual Device Manager, the Android Virtual Machine manager, in which we will find a pre-existing virtual machine already created.️
 We will eliminate the existing virtual machine and create a new one based on the Pixel 6 mobile, with the system image
 Google APIs, version API 34 and architecture ABI x86_64. Another option would be to use the system image Google Play with the device Pixel 7. The rest of the hardware configuration can be set to default except for the Boot option which will be configured as Cold boot, by pressing the Show Advanced Settings button. If we want to assign more resources to the virtual machine, we can modify the settings. After creating it, we can run it.️
 If we accept the Windows Firewall alert, we will finally have a virtual machine based on Android 14.️
Virtual Machine Configuration️
After installing the machine, we will check that it is configured in English, and we can change the language from Settings > System > Languages > System Languages. The virtual machine has several Google applications pre-installed, so we will disable them with the ADB tool from the terminal using the following commands.️
$ adb shell pm disable-user --user 0 com.google.android.calendar
$ adb shell pm disable-user --user 0 com.android.chrome
$ adb shell pm disable-user --user 0 com.google.android.contacts
$ adb shell pm disable-user --user 0 com.google.android.apps.docs
$ adb shell pm disable-user --user 0 com.google.android.apps.photos
$ adb shell pm disable-user --user 0 com.google.android.gm
$ adb shell pm disable-user --user 0 com.google.android.googlequicksearchbox
$ adb shell pm disable-user --user 0 com.google.android.apps.maps
$ adb shell pm disable-user --user 0 com.google.android.deskclock
$ adb shell pm disable-user --user 0 com.google.android.youtube
$ adb shell pm disable-user --user 0 com.google.android.apps.youtube.music
Magisk install and root
We will install Magisk, a program that allows us to root the virtual machine by obtaining superuser permissions and installing modules on the system without directly modifying it. To do this, we will use the rootAVD script, which we will download and extract.️
We will need to copy the ramdisk.img file corresponding to the system image and copy it to our virtual machine directory. In this case, the file is located in the SDK path SDK/system-images/android-34/google-apis/x86_64/ramdisk.img and the virtual machine is located in the directory of the previously set environment variable Home/avd/Pixel_6_API_34.avd.️
We open a terminal in the directory where we have extracted the rootAVD script and turn on the virtual machine. We will copy the file, set an environment variable for rootAVD, and run the script. When it asks us for the version of Magisk to install, we select option 2 (latest stable version).️
$ copy C:\Users\Usuario\Documents\Android\SDK\system-images\android-34\google_apis\x86_64\ramdisk.img C:\Users\Usuario\Documents\Android\Home\avd\Pixel_6_API_34.avd\
$ set ANDROID_HOME=C:\Users\Usuario\Documents\Android\SDK
$ rootAVD.bat ..\Home\avd\Pixel_6_API_34.avd\ramdisk.img
[?] Choose a Magisk Version to install and make it local
[s] (s)how all available Magisk Versions
[1] local stable '25.2' (ENTER)
[2] stable 26.3
[3] canary 0352ea2c(26302)
[4] alpha 15e13a8d-alpha(26302)
2
[-] You choose Magisk stable Version 26.3
The machine will shut down and upon restarting we will have the Magisk application installed. Upon opening it, it will indicate that the device needs additional configuration, which we will accept by selecting the Direct Installation method and the device will restart. Occasionally, the message may continue to appear after the restart, but this can be ignored as the application indicates that Magisk is already installed.️
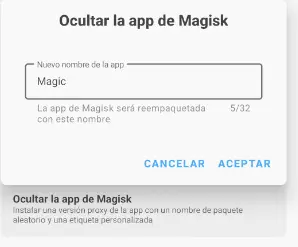
 Configuring Magisk to prevent apps from detecting it and blocking its execution. First, in settings we will select the option
 Hide Magisk app, and enter a random name. This will cause Magisk to reinstall with a random package name.️
 Finally activate the
 Zygisk option so that Magisk runs in the Android Zygote process, select the Apply Denylist option and in the Configure Denylist option choose the applications you don’t want to detect that you have Magisk installed and perform a device reboot.️
Magisk Modules installing
With Magisk installed, we will install several Magisk modules that will facilitate future tasks. To install them, it is necessary to download the compressed ZIP file of each module, send them to the virtual machine by dragging the file into the window. Subsequently, Magisk will open, select the option Modules and select the uploaded file by pressing the Install from storage button. The file is located in the Downloads folder.️
- MagiskFrida [Download]: This module allows you to install the Frida server and start it automatically when the operating system boots up.️
Installation of additional applications️
Optional applications can be installed from the Aurora Store, which is an open-source alternative to the Play Store for downloading apps in case they are missing from the virtual machine. Apps install by dragging them into the emulator window or using ADB.️
$ adb install aplicacion_a_instalar.apk
Frida install
Previously, MagiskFrida’s Magisk module has been installed. Frida allows us to inject code into running programs, commonly used in reverse engineering analysis. To use it, installation of its client on our host operating system is required. As a prerequisite, installation of Python is needed. Next, we create a new Python virtual environment, activate it and install Frida tools from the Pip package manager.️
$ python -m virtualenv frida_env
$ fridaenv\Scripts\activate
$ pip install frida-tools
Conclusion️
With the installation of the Android emulator environment, we will proceed to observe various dynamic analysis techniques for Android applications in future articles.️